Nginx is an open source web server and a reverse proxy server for HTTP, SMTP, POP3, and IMAP protocols, with a strong focus on high concurrency, performance and low memory usage. It is licensed under a BSD-like license and it runs on Unix, Linux, BSD variants, Mac OS X, Solaris, AIX, HP-UX, and Microsoft Windows.
Part 1 Preparation before installation
1.1 First, go to the official website to download the latest version of the installer:
Nginx Official Website nginx.org
PHP Official Website php.net
Oracle Official Website www.oracle.com
Download nginx-1.5.1.zip file from nginx.org/en/download.html.
Download php-5.4.16-nts-Win32-VC9-x86.zip windows.php.net/downloads/releases/archives.
Download MySQL Community Server 5.6.10.1 from www.mysql.com/downloads/mysql
Three software installation package downloaded.

1.2 Install MySQL Community Server.
Can refer to Installation WAMP ( Apache, MySQL, PHP ) on Microsoft Windows
1.3 Unzip NGINX and PHP into your own installation location. For example:
Nginx directory C:\server\nginx
PHP directory C:\server\php
Part 2 Configuration Nginx
2.1 Open the C:\server\nginx directory, run nginx.exe in the folder
2.2 Test whether to start nginx. Open your browser and visit to http://localhost or http://127.0.0.1, see if prompt "Welcome to nginx!", If the display has already proved successful launch.
Can't access localhost solutions please refer to WampServer local installation WordPress
Note: This site directory in C:\server\nginx\html
2.3 Find the Nginx configuration file nginx.conf location (installation directory conf folder), use a text editor opens.
2.4 Find the following code (About 43 to 45 lines)
location / {
            root   html;
            index  index.html index.htm;
        }
Modified to
location / {
    root   C:/server/www; # Modify the site file path
    index  index.php index.html index.htm; # Add index.php the default page
    autoindex on
}
2.5 Find the following code (About 63 to 71 lines)
# pass the PHP scripts to FastCGI server listening on 127.0.0.1:9000
#
# location ~ \.php$ {
#    root           html;
#    fastcgi_pass   127.0.0.1:9000;
#    fastcgi_index  index.php;
#    fastcgi_param  SCRIPT_FILENAME  /scripts$fastcgi_script_name;
#    include        fastcgi_params;
# }
Modified to
# pass the PHP scripts to FastCGI server listening on 127.0.0.1:9000
location ~ \.php$ {
    root           C:/server/www;
    fastcgi_pass   127.0.0.1:9000;
    fastcgi_index  index.php;
    fastcgi_param  SCRIPT_FILENAME  $document_root$fastcgi_script_name;
    include        fastcgi_params;
}
Part 3 Configuration PHP
3.1 Copy php.ini-development file, and the file name to php.ini, modify the php configuration file php.ini.
730 lines Find the
;extension_dir = "ext"
modified to
extension_dir = "C:\server\php\ext"
919 lines Find the
;date.timezone =
modified to
date.timezone =Asia/Shanghai
736 lines Find the
enable_dl = Off
modified to
enable_dl = On
743 lines Find the
;cgi.force_redirect = 1
modified to
cgi.force_redirect = 1
771 lines Find the
;fastcgi.impersonate = 1
modified to
fastcgi.impersonate = 1
783 lines Find the
;cgi.rfc2616_headers = 0
modified to
cgi.rfc2616_headers = 1
No. 880,881 lines, remove the front ; extension = php_mysql.dll and extension = php_mysqli.dll (supports MySQL database).
3.2 Download RunHiddenConsole.zip extract to C:\server\nginx\RunHiddenConsole.exe
3.3 Create Start bat file
@echo off
echo Starting PHP FastCGI...
RunHiddenConsole.exe c:/server/php/php-cgi.exe -b 127.0.0.1:9000  -c C:/server/php/php.ini
echo Starting nginx...
C:/server/nginx/nginx.exe
3.4 Create Stop bat file
@echo off
echo Stopping nginx...
taskkill /F /IM nginx.exe > nul
echo Stopping PHP FastCGI...
taskkill /F /IM php-cgi.exe > nul
exit
The resulting directory structure.

Part 4
4.1 Start nginx. Click start_php.bat
4.2 In C:\server\www directory to create a file index.php, written the following code in the index.php file, save.
<?php phpinfo(); ?>
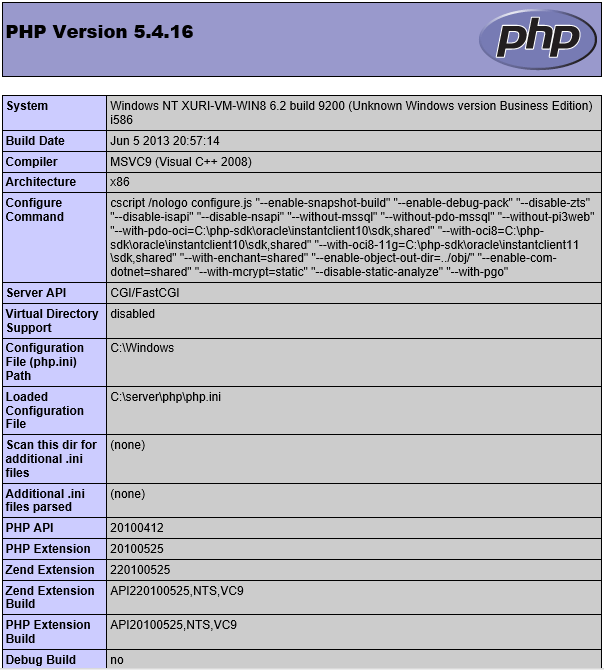
4.3 In the browser to access http://localhost/. If you get the following information, proved WNMP ( Nginx, MySQL, PHP ) has been built successfully.
Thank you!
I got a error "The system cannot find the path specified" on starting the batch file
Try to remove "@echo off" at the top of run.bat script, and add a "pause" at the very end of the script. Then run the script and look at the output for each of the commands until you find the error, and then you can see which command it did it for.
Thanks I got it working :)
Thanks Ri Xu, your guide is great!
Just one question, I'm using a virtual server and the php only works if I listen at the port 80. if I change it to port 8080, the nginx serves the html but if I try to open a php file it doesnt work (it offers to download it.) I dont see why the http listening port conflicts with fastcgi listenint at port 9000 ...
First check the nginx error log to detailed error information obtained, I think there may be a conflict caused by the 9000 occupation of the port.
Viewing System 9000 port connection status, run in cmd in windows
netstat -ano | find ":9000"
if you found that 9000 port is occupied, use the Task Manager to view the PID, kill occupied process or change the FastCGI port, php page views properly. I hope this is helpful for you.
Hi Ri Xu
I tried your suggestions and there's not conflict with the port, and nothing in the error.log. I think I will start over with the default nginx configuration.
thanks!
Thank you Ri Xu. Very kind and helpful information. Really Appreciate you. Thank you
this code cannot use in nginx :
# pass the PHP scripts to FastCGI server listening on 127.0.0.1:9000
location ~ .php$ {
root C:/server/www;
fastcgi_pass 127.0.0.1:9000;
fastcgi_index index.php;
fastcgi_param SCRIPT_FILENAME $document_root$fastcgi_script_name;
include fastcgi_params;
}
his code cannot use in nginx,please give another correct code (i use this code in nginx 1.4.7 windows) :
# pass the PHP scripts to FastCGI server listening on 127.0.0.1:9000
location ~ .php$ {
root C:/server/www;
fastcgi_pass 127.0.0.1:9000;
fastcgi_index index.php;
fastcgi_param SCRIPT_FILENAME $document_root$fastcgi_script_name;
include fastcgi_params;
}
This is my file https://drive.google.com/file/d/0B3-rWoshACJKVWhKbGdIWUFLekk/edit?usp=sharing, download and unzip the file, then placed the “server” folder in C:/.
thanks!
I did exactly d same thing as said above,but wen i type localhost in d browser ,it says could not connect to localhost.Could you please help me
Use this
Location / {
root html;
index index.php index.html index.htm;
autoindex on;
}
instead of
Location / {
root html;
index index.html index.htm;
autoindex on;
}
phpinfo() is working but when i connect with mysql database its showing in browser "No connection could be made because the target machine actively refused it"