Wiki
Dnsmasq
Dnsmasq provides network infrastructure for small networks: DNS, DHCP, router advertisement and network boot. It is designed to be lightweight and have a small footprint, suitable for resource constrained routers and firewalls. It has also been widely used for tethering on smartphones and portable hotspots, and to support virtual networking in virtualisation frameworks. Supported platforms include Linux (with glibc and uclibc), Android, *BSD, and Mac OS X. Dnsmasq is included in most Linux distributions and the ports systems of FreeBSD, OpenBSD and NetBSD. Dnsmasq provides full IPv6 support.
Wildcard DNS record
A wildcard DNS record is a record in a DNS zone that will match requests for non-existent domain names. A wildcard DNS record is specified by using a "*" as the leftmost label (part) of a domain name, e.g. *.example.com. The exact rules for when a wild card will match are specified in RFC 1034, but the rules are neither intuitive nor clearly specified. This has resulted in incompatible implementations and unexpected results when they are used.
Install brew
Run command in terminal
$ ruby -e "$(curl -fsSL https://raw.github.com/Homebrew/homebrew/go/install)"
Install Dnsmasq via brew
$ brew install dnsmasq
After install, create etc folder in /usr/local/ path, then copy and rename /usr/local/opt/dnsmasq/dnsmasq.conf.example to /usr/local/etc/dnsmasq.conf
$ sudo cp /usr/local/opt/dnsmasq/dnsmasq.conf.example /usr/local/etc/dnsmasq.conf
Creat resolv.dnsmasq.conf in etc folder
$ sudo touch /usr/local/etc/resolv.dnsmasq.conf
Use your favorite text editor to edit the resolv.dnsmasq.conf file
$ sudo subl /usr/local/etc/resolv.dnsmasq.conf
Add your favorite DNS address, you can add more, such as OpenDNS, like this
nameserver 8.8.8.8
nameserver 8.8.4.4
nameserver 42.120.21.30
nameserver 168.95.1.1
Then edit dnsmasq.conf file, add following code
resolv-file=/usr/local/etc/resolv.dnsmasq.conf
strict-order
no-hosts
cache-size=32768
listen-address=127.0.0.1
Note: that's possible that more than one listen-address behind the IP separated by a comma, for example, you write the
listen-address=127.0.0.1,192.168.1.102, 192.168.1.102 is your computer IP address in current network, you can achieve the same equipment within a local area network by setting the DNS for the IP, to achieve through your dnsmasq to query dns, ie a LAN WildCard DNS Record.
To start automatically and run Dnsmasq, running in a Terminal
$ sudo cp -fv /usr/local/opt/dnsmasq/*.plist /Library/LaunchDaemons
$ sudo launchctl load /Library/LaunchDaemons/homebrew.mxcl.dnsmasq.plist
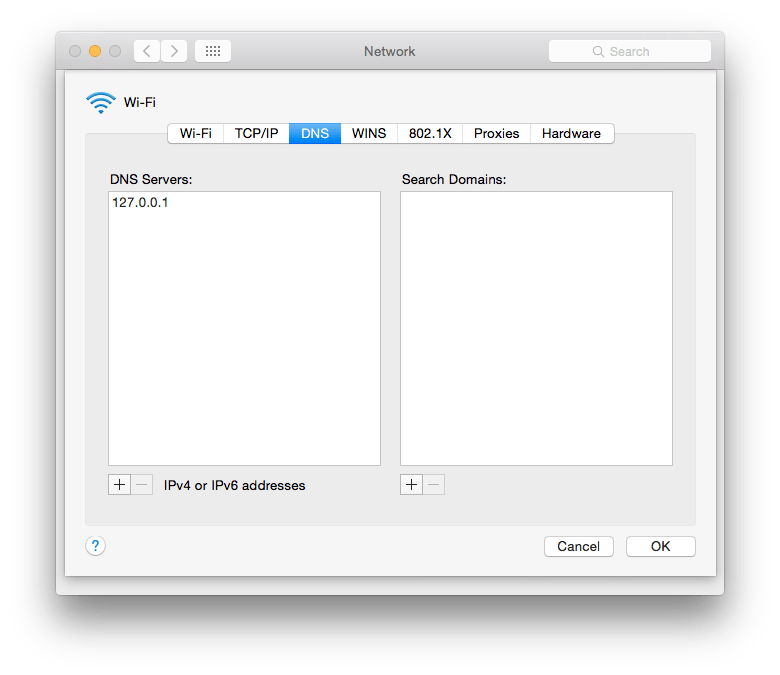
Now, you can set you Mac DNS to 127.0.0.1 to use Dnsmasq. With LAN users can also modify the DNS IP to connect this Mac. This premise is to set this Mac IP in listen-address.
IFirewall Configuration
If you're using Ubuntu server, the default firewall configuration tool for Ubuntu is ufw. Anyway for anyone that is wondering, to allow a DHCP server to work through ufw, after enabling ufw on the same computer as is running the DHCP server, by running:
$ sudo ufw enable
all you need to do is:
$ sudo ufw allow bootps
Also if you are using dnsmasq like me and you want the same computer to work as a dns forwarder, you will want to run:
$ sudo ufw allow domain

To check the operation, you can run following command in a terminal to check whether you are using the local dns Dnsmasq were parsed.
$ dig g.cn
Dnsmasq Wildcard DNS Record
We just installed the dnsmasq, now configure Wildcard DNS record. To add rules, only additional content to file in dnsmasq.conf
Dnsmasq Wildcard DNS Record Rules like this
address=/google.com/1.1.1.1
This means, *. google.com/* will be directed to the IP of 1.1.1.1.
Google Wildcard DNS Record Service
Let's add the Wildcard DNS record rules apply to most Google services.
First need to find an available IP. It is best servers in the United States, this will ensure that most of the services available.
Known Google's IP is available in China is 74.125.224.18
Add following rules in /usr/local/etc/dnsmasq.conf file.
address=/google.com/74.125.224.18
address=/googleapis.com/74.125.224.18
address=/googlevideo.com/74.125.224.18
address=/google.com.hk/74.125.224.18
address=/youtube.com/74.125.224.18
address=/ytimg.com/74.125.224.18
address=/ggpht.com/74.125.224.18
address=/googleusercontent.com/74.125.224.18
Restart Dnsmasq Service
$ sudo launchctl stop homebrew.mxcl.dnsmasq
$ sudo launchctl start homebrew.mxcl.dnsmasq
Flush Local DNS Cache
OS X 10.10
$ sudo discoveryutil udnsflushcaches
OS X 10.9
dscacheutil -flushcache; sudo killall -HUP mDNSResponder
OS X 10.7 – 10.8
$ sudo killall -HUP mDNSResponder
OS X 10.5 – 10.6
$ sudo dscacheutil -flushcache
Microsoft Windows
$ ipconfig /flushdns
Linux (depending on what you’re running)
/etc/init.d/named restart
/etc/init.d/nscd restart
If you're using Google Chrome browser, visit chrome://net-internals/#dns to cleanup cache.
Install Dnsmasq on Ubuntu
$ sudo apt-get install dnsmasq
Configure Dnsmasq
$ sudo vim /etc/dnsmasq.conf
Uncomment conf-dir=/etc/dnsmasq.d, and create dnsmasq.conf file in /etc/dnsmasq.d folder, then edit it.
$ sudo vim /etc/dnsmasq.d/dnsmasq.conf
Start Dnsmasq Service
$ sudo service dnsmasq start