This tutorial will show you how to set up an Apache server to run PHP on a mac OSX 10.8+ with Mountain Lion or later operation system.
Part 1 set up an Apache server to run PHP on a mac OSX 10.8+ with Mountain Lion or later operation system
What you need to know since the release of Mountain Lion
Apple changed its hosting environment for OS X 10.8 +
Apple dropped the GUI option to turn on web sharing, but it's still possible to do manually.
If you upgraded from a previous version of OS X your hosting environment will be broken.
Apache is still installed on your Mac by default.
Step 1
How to start your Apache web server:
Apache comes preinstalled on Apple OS X 10.8 Mountain Lion
Open your Terminal (found in your Utilities folder which is inside your Applications folder)
To start the Apache server type the following command in your Terminal window
$ sudo apachectl start
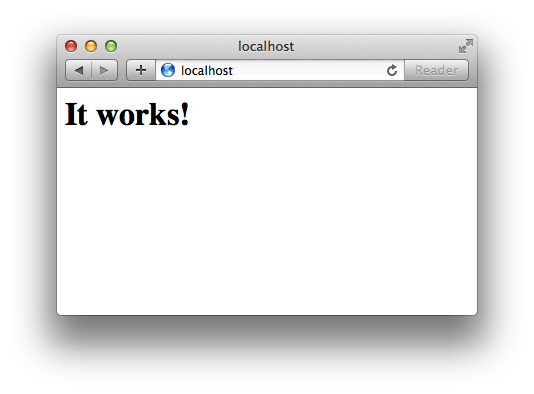
Press Enter and Apache will start. If you open your internet browser and navigation to http://localhost. You will see the following. Congratulations you now have a running Apache server.
To stop the Apache web server type the following command in your Terminal:
$ sudo apachectl stop
To restart it
$ sudo apachectl restart
To find the Apache version
$ httpd -v
Step 2
How to Configure Apache to enable PHP:
You will need to edit your Apache Httpd configuration file to enable PHP.
Inside your Terminal window type the following command to open the httpd.conf file in the editor nano
$ sudo nano /etc/apache2/httpd.conf
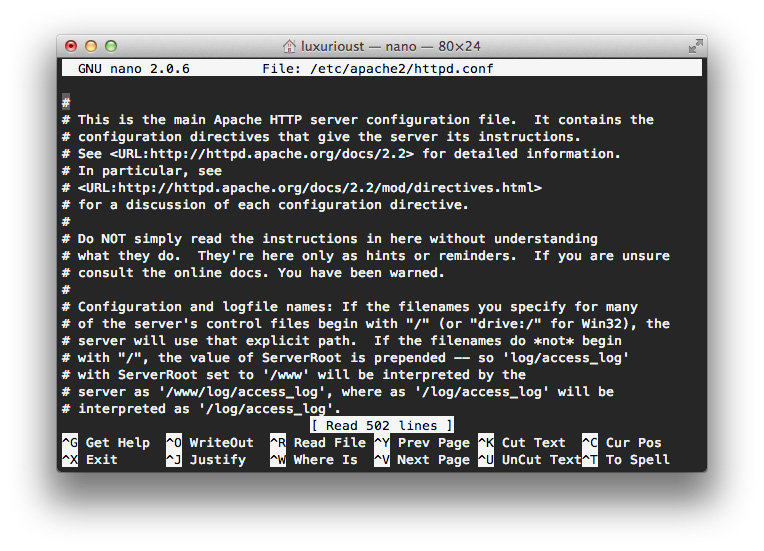
Uncomment the php line
Now that the file is open, find the line where LoadModule php5_module libexec/apache2/libphp5.so is commented out. Remove the # in the front of the line commenting it out. This will enable PHP.

Step 3
How to set up a user configuration file:
To host files in your Sites/ directory you will need to create a user file for your osx user (use the user short name, if unsure of what it is go /Users directory and you will see the short names of all the users)
Create the file by typing the following in your Terminal. Using nano will open the file if it already exists or create it if it doesn't. Replace [username] with your username
$ sudo nano /etc/apache2/users/username.conf
Add the following lines to the file.*Important: the directory path in the first line is case sensitive.
<Directory "/Users/username/Sites" >
    Options FollowSymLinks Indexes MultiViews
    AllowOverride All
    Order allow,deny
    Allow from all
</Directory>
Hold Ctrl X to save and exit. Type Y to confirm. Then press enter.
Set the permission of the user configuration file by typing the following in your Terminal
$ sudo chmod 644 /etc/apache2/users/username.conf
Step 4
How to enable and configure Htaccess:
.htaccess is not enabled by default. Many php applications rely on htaccess for URL routing.
Again open the httpd.conf file in your terminal.
$ sudo nano /etc/apache2/httpd.conf
Now press control+w to search in the Nano editor. Search for the word override. On all instances, change AllowOverride None to AllowOverride All. Save the file.
In your terminal type the following and press enter to restart your Apache server.
$ sudo apachectl restart
Step 5
Test it out:
Create a test file in your Sites folder called phpinfo.php
1. Check that your Sites folder exists in your Users/username/ directory. If not then create it.
2. Next you will need to create a phpinfo.php file
$ sudo nano /Users/username/Sites/phpinfo.php
In your file add the following.
<?php phpinfo(); ?>
Save the file and exit the editor
3. Open your internet browser and type http://localhost/~username/phpinfo.php
You should now see the phpinfo file load.
Congratulations! You have set up your PHP Apache server on your mac.
Part 2 setting up Mysql on your Mac's localhost
Step 1
Download MySQL:
You need to download and install MySQL on your Mac.
1. Go to the MySQL site, scroll down the page and look for version Mac OS X ver. 10.7 (x86, 64-bit), DMG Archive. Click the blue download button.
This will take you to a page that asks you to login or signup. You don't have to signup, instead there is a link right below these buttons. Click the link No thanks, just start my download.. This will start the download.
2. After downloaded you will need to install all 3 of the components in the package.
Double-click on each package to install them.
mysql-5.6.14-osx10.7-x86_64.pkg – MySQL software
MySQL.prefPane – Allows mysql to stop/start
MYSQLStartupItem.pkg – Allows mysql to start when booted
Step 2
Start MySQL:
To start MySQL via the command line
$ sudo /usr/local/mysql/support-files/mysql.server start
Or you can click Start MySQL Server when the dialog opens after installing the 2nd package.

Step 3
Set MySQL root password:
$ /usr/local/mysql/bin/mysqladmin -u root password 'yourpassword'
That's it. You have MySQL installed and running on your localhost.
Part 3 setting up phpMyAdmin on your Mac's localhost
Step 1
Fix socket error:
$ sudo mkdir /var/mysql
$ sudo ln -s /tmp/mysql.sock /var/mysql/mysql.sock
Step 2
Download phpMyAdmin:
Go to phpMyAdmin download page and choose the file in your language. I usually download phpMyAdmin-3.5.6-english.tar.gz
Unzip the file, rename it to phpMyAdmin, and move it into your Sites folder. You may need to create a Sites folder in your users directory /Users/username/Sites/phpMyAdmin.
Step 3
Setup phpMyAdmin config:
1. Make the config folder
$ mkdir ~/Sites/phpMyAdmin/config
2. Change the permissions
$ chmod o+w ~/Sites/phpMyAdmin/config
Go to the new phpMyAdmin localhost URL in your browser and run the phpMyAdmin setup
Step 4
Setup phpMyAdmin settings:
1. Open your browser and go to the url localhost/~username/phpMyAdmin/setup/
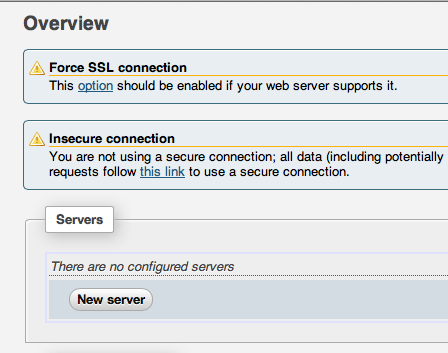
2. Click "New server"
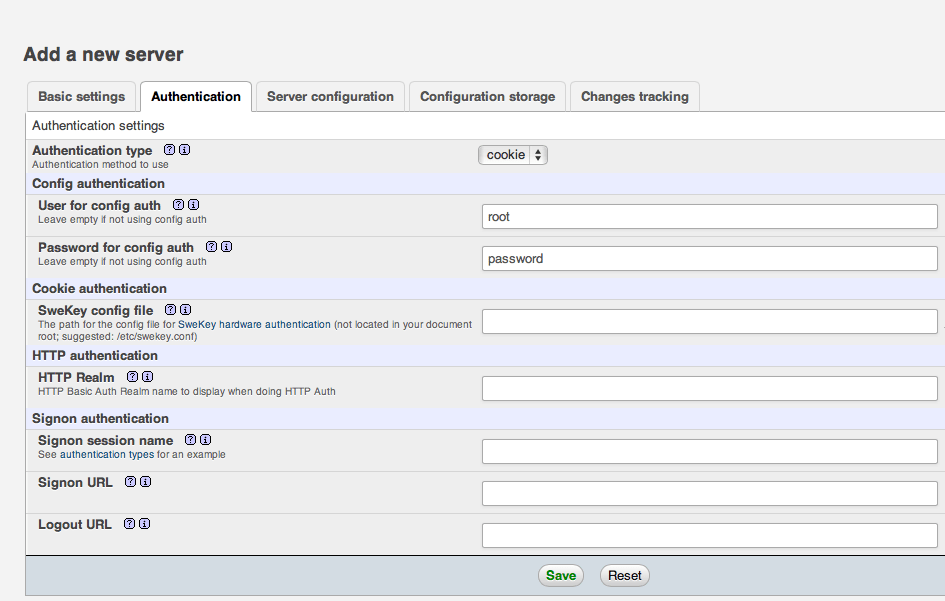
3. The new page will load and click on the "Authentication" Tab
4. Enter the MySQL root user and password (this was set in the previous mysql setup tutorial)
5. Click "Save" – This will take you back to the previous screen.
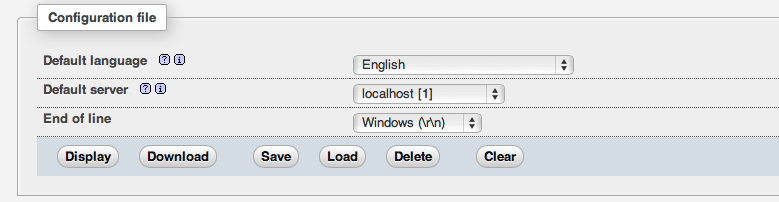
6. Scroll to the bottom of the page and click "Save" to finish
7. A new file called config.inc.php is now created in the /config directory that we created previously. Move this file from phpMyAdmin/config/ to phpMyAdmin/
8. Delete the /config folder
Step 5
Go to your newly created phpMyAdmin:
1. Make sure your MySQL is running
$ sudo /usr/local/mysql/support-files/mysql.server start
2. Open your browser and go to the your phpMyAdmin url localhost/~username/phpMyAdmin/
3. Login using your mysql username and password
Congratulations! You have now installed phpMyAdmin to run on your Mac localhost.
This article references How to install Apache and PHP on a Mac with OSX 10.8 + , with slight changes.