
MySQL Cluster is a technology providing shared-nothing clustering and auto-sharding for the MySQL database management system. It is designed to provide high availability and high throughput with low latency, while allowing for near linear scalability. MySQL Cluster is implemented through the NDB or NDBCLUSTER storage engine for MySQL ("NDB" stands for Network Database).
Developer's Official Website www.oracle.com
This post is is a guide on how to create a MySQL cluster on Ubuntu 12.04 LTS server distribution.
Please do note that MySQL clusters have set limitations compared to one server MySQL configuration. Before venturing on with creating a MySQL cluster, do check the following page here. Personally I would recommend creating a PostgreSQL cluster.
1. SQL Cluster VM's
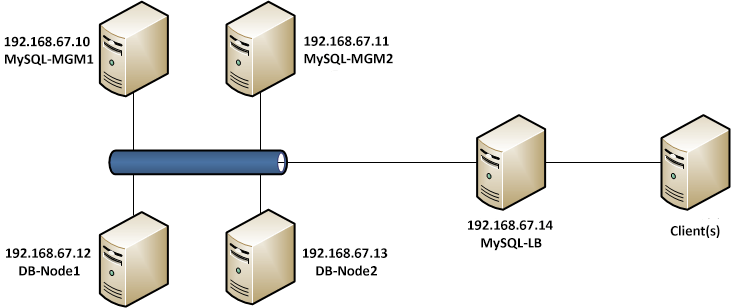
To create a fully functional cluster you need a minimum of 3 VM's to complete. One Virtual Machine to act as the cluster management and two database nodes. In case one of the DB-nodes goes offline, the cluster can still work and will synchronize once the node is back up. The Management node can also be inaccessible but will most likely case a “Split-Brain" issue with inconsistent data between the two working DB-nodes. In my example I will include a second management node to the cluster to give you an example on how it will work.
In this tutorial I will walk you trough installing a total of 5 VM's, where two of which as Management Nodes, two are DB nodes and one is a MySQL proxy. It is possible to add additional nodes to the cluster later on and the single MySQL-proxy is possible to make Highly Avaiable (HA), but not covered in this post.
Virtual Machine Cluster Platform    VMware ESXi 4.1
Virtual Machine Operating System    Ubuntu 12.04.3 LTS (Precise Pangolin) 64-bit

All virtual machines are in the same 192.168.67.0/24 network, but the load-balancer could as well have a connection to the outside network. This will vary from your network configuration and should be treated as a simple example network. Before you continue, you should have all VM's working and have at least local network connectivity working.
2. Installing the management nodes
First off we need to install the management nodes of the MySQL cluster. We will start off with MySQL-MGM1 and once it is completed, the procedure should be carried out on the second management host. If you prefer to have only one management VM, just leave it out of the configuration and you are clear to go.
Before you continue, go to http://www.mysql.com/downloads/cluster/#downloads and verify which version is the current one. This guide has been made for MySQL cluster version 7.3.3.
First we want to download the MySQL cluster packages to the management host to a good location. Navigate to /usr/src directrory and create mysql-mgm directory.
$ sudo mkdir /usr/src/mysql-mgm
$ cd /usr/src/mysql-mgm
After that is done, download the latest source from the mysql download site and extract the package.
$ sudo wget http://cdn.mysql.com/Downloads/MySQL-Cluster-7.3/mysql-cluster-gpl-7.3.3-linux-glibc2.5-x86_64.tar.gz
$ sudo tar xvfz mysql-cluster-gpl-7.3.3-linux-glibc2.5-x86_64.tar.gz
Navigate to the extracted folder and move the binaries.
$ cd mysql-cluster-gpl-7.3.3-linux-glibc2.5-x86_64
$ sudo cp bin/ndb_mgm /usr/bin
$ sudo cp bin/ndb_mgmd /usr/bin
Change the permissions for the directory and optionally remove the downloaded source.
$ sudo chmod 755 /usr/bin/ndb_mg*
$ cd /usr/src
$ sudo rm -rf /usr/src/mysql-mgm
Next, we must create the cluster configuration file in /var/lib/mysql-cluster/ named config.ini
The folder doesn't exist so you need to create it:
$ sudo mkdir /var/lib/mysql-cluster
After which a config.ini file can be created with your favourite text editor.
[NDBD DEFAULT]

NoOfReplicas=2
DataMemory=80M
IndexMemory=18M
[MYSQLD DEFAULT]

[NDB_MGMD DEFAULT]
DataDir=/var/lib/mysql-cluster
[TCP DEFAULT]

# Section for the cluster management node
[NDB_MGMD]
NodeId=1
# IP address of the first management node (this system)
HostName=192.168.67.10

[NDB_MGMD]
NodeId=2
#IP address of the second management node
HostName=192.168.67.11

# Section for the storage nodes
[NDBD]
# IP address of the first storage node
HostName=192.168.67.12
DataDir= /var/lib/mysql-cluster
[NDBD]
# IP address of the second storage node
HostName=192.168.67.13
DataDir=/var/lib/mysql-cluster
# one [MYSQLD] per storage node
[MYSQLD]
[MYSQLD]
Note that all hosts are defined at this stage, even though we are only installing the first one. Note that the management host nodes need the NodeID specifed where as the NDBD nodes do not.
Once this is done you can start the management node with the following command:
$ sudo ndb_mgmd -f /var/lib/mysql-cluster/config.ini --configdir=/var/lib/mysql-cluster/
Once that is done, you can automate the start procedure by entering an entry to the init.d with the following commands:
$ sudo echo "ndb_mgmd -f /var/lib/mysql-cluster/config.ini --configdir=/var/lib/mysql-cluster/" > /etc/init.d/ndb_mgmd
$ sudo chmod 755 /etc/init.d/ndb_mgmd
Once everything is working, follow the same procedure on the second management node and use the same configuration. You mustn't change the node ID's in the configuration file!
You can verify that both management nodes are operational by entering ndb_mgm (just enter ndb_mgm in terminal) and by typing show once in the configuration utility. At this point both ndbd nodes and mysql nodes are disconnected.
3. The database nodes
Creating the DB nodes is fairly simliar to creating the management nodes. First off lets start by creating a mysql group and adding a user to it.
$ sudo groupadd mysql
$ sudo useradd -g mysql mysql
Navigate to /usr/local and download the same compressed file as to the management nodes and extract it.
$ cd /usr/local/
$ sudo wget http://cdn.mysql.com/Downloads/MySQL-Cluster-7.3/mysql-cluster-gpl-7.3.3-linux-glibc2.5-x86_64.tar.gz
$ sudo tar xvfz mysql-cluster-gpl-7.3.3-linux-glibc2.5-x86_64.tar.gz
Create a symbolic link named mysql pointing to the extracted folder (this will be later used by the DB cluster so do not delete it!). Once the symlink is complete you can install the database.
$ sudo ln -s mysql-cluster-gpl-7.3.3-linux-glibc2.5-x86_64 mysql
$ cd mysql
$ sudo apt-get install libaio1 libaio-dev
$ sudo scripts/mysql_install_db --user=mysql --datadir=/usr/local/mysql/data
Change the owner to the newly created mysql group
$ sudo chown -R root:mysql .
$ sudo chown -R mysql data
Like on the management nodes, we want the databae engine to start automatically and thus we need to create the command to init.d.
$ sudo cp support-files/mysql.server /etc/init.d/
$ sudo chmod 755 /etc/init.d/mysql.server
Lastly copy the bin files to the /usr/bin location to keep everything neat and create a symlink to keep references right.
$ cd /usr/local/mysql/bin
$ sudo mv * /usr/bin
$ cd ../
$ sudo rm -fr /usr/local/mysql/bin
$ sudo ln -s /usr/bin /usr/local/mysql/bin
The MySQL configuration file is missing at first so we need to create it ourselves. The file is located in /etc/ and is named my.cnf. Open your favorite texteditor and add the following lines to it:
[mysqld]
ndbcluster
# IP address of the cluster management node
ndb-connectstring=192.168.67.10,192.168.67.11
[mysql_cluster]
# IP address of the cluster management node
ndb-connectstring=192.168.67.10,192.168.67.11
Note that both management nodes are entered, seperated by a comma. If you only have one management node, just remove the second one in the list. Once my.cnf file has been saved we need to create the data folders for MySQL.
$ sudo mkdir /var/lib/mysql-cluster
Once that is done, we just need to initialize the cluster and start the service. The initialization needs to be done only when you start the node for the first time, or when /var/lib/mysql-cluster/config.ini file has been changed on the management node(s).
$ cd /var/lib/mysql-cluster
$ sudo ndbd –-initial
$ sudo /etc/init.d/mysql.server start
After this, secure the MySQL installation by running the appropriate script:
$ sudo /usr/local/mysql/bin/mysql_secure_installation
And lastly we need ndb to start automatically:
$ sudo echo "ndbd" > /etc/init.d/ndbd
$ sudo chmod 755 /etc/init.d/ndbd
Once everything is done, you've completed the first node. Follow the steps on the second database node to get it up and running.
4. Testing and Verification
Once everything is completed it's time to verify our configuration to see that everything is working as intended. To do this, we need to verify that all nodes are visible and connected one one of the management nodes. Open the ndb management shell by typing ndb_mgm in terminal and type show. This time you should see that the database nodes have been populated in the output.
root@MYSQL-MGM1:~# ndb_mgm
ndb_mgm> show
Cluster Configuration
---------------------
[ndbd(NDB)] 2 node(s)
id=3    @192.168.67.12  (mysql-5.6.14 ndb-7.3.3, Nodegroup: 0, *)
id=4    @192.168.67.13  (mysql-5.6.14 ndb-7.3.3, Nodegroup: 0)

[ndb_mgmd(MGM)] 2 node(s)
id=1    @192.168.67.10  (mysql-5.6.14 ndb-7.3.3)
id=2    @192.168.67.11  (mysql-5.6.14 ndb-7.3.3)

[mysqld(API)]   2 node(s)
id=5    @192.168.67.12  (mysql-5.6.14 ndb-7.3.3)
id=6    @192.168.67.13  (mysql-5.6.14 ndb-7.3.3)
If you see a similar output, you are clear to go and try out some basic SQL commands. Move to the first DB node in the cluster. Log in to the SQL database and create a new database, table to verify replication. Note that when creating a database, the engine for the tables has to be NDBCLUSTER. If you use InnoDB for example, the data will NOT be replicated between the cluster nodes. There are some drawbacks when using ndbcluster as your engine, which can be found in the MySQL website.
http://dev.mysql.com/doc/refman/5.5/en/mysql-cluster-limitations-unsupported.html
http://dev.mysql.com/doc/refman/5.5/en/mysql-cluster-limitations-syntax.html
$ mysql -u root -p
mysql> CREATE DATABASE mysqlclustertest;
mysql> USE mysqlclustertest;
mysql> CREATE TABLE testtable (i INT) ENGINE=NDBCLUSTER;
mysql> INSERT INTO testtable () VALUES (1);
mysql> SELECT * FROM testtable;
+------+
| i    |
+------+
|    1 |
+------+
1 row in set (0.01 sec)
Connect to the second database node and lets see if we get the same output.
mysql -u root -p
mysql> USE mysqlclustertest;
mysql> SELECT * FROM testtable;
+------+
| i    |
+------+
|    1 |
+------+
1 row in set (0.01 sec)
You should see the same output as on the first node when doing the select statement. Now if you insert a new entry to the table, it will be replicated back to the first node.
5. Loadbalancer
The last part in our guide is to install the load-balancer to get some additional use of the MySQL-cluster. The loadbalancer can be something else than the mysql-proxy, but this is easy and simple to install and does it's job. You could use something like pFsense if you'd like to.
root@mysql-proxy:~# apt-get install mysql-proxy
root@mysql-proxy:~# mkdir /etc/mysql-proxy
root@mysql-proxy:~# cd /etc/mysql-proxy
root@mysql-proxy:/etc/mysql-proxy# nano mysql-proxy.conf
And add the following to your mysql-proxy.conf
[mysql-proxy]
daemon = true
proxy-address = 192.168.67.14:3306
proxy-skip-profiling = true
keepalive = true
event-threads = 50
pid-file = /var/run/mysql-proxy.pid
log-file = /var/log/mysql-proxy.log
log-level = debug
proxy-backend-addresses = 192.168.67.12:3306,192.168.67.13:3306
proxy-lua-script=/usr/lib/mysql-proxy/lua/proxy/balance.lua
For automatic start with additional options create the following file /etc/default/mysql-proxy
ENABLED="true"
OPTIONS="--defaults-file=/etc/mysql-proxy.conf --plugins=proxy"
After that you can start the mysql-proxy by invoking the this command: /etc/init.d/mysql-proxy start/stop/status
Once this is completed, you should be able to connect to the MySQL servers using the proxy address. Do remember that for this to work, you will need to create a new user that has a specific subnet allowed to connect to it. You will also need to add to the my.cnf file the bind-address for the MySQL servers.
SQL users do not replicate, so the same user has to be added to all database nodes individually. Once logged in to the DB node SQL shell, execute the following command:
CREATE USER 'newuser'@'192.168.67.%' IDENTIFIED BY 'password';
FLUSH PRIVILEGES;
SELECT * FROM mysql.user;
Change newuser, ip and password as per your configuration needs. The % in the IP-address acts as a wildcard and thus the whole subnet it allowed to connect remotely to this DB node. Remember to flush privileges after the user has been added. Remember to add the same user with same configuration to all other Database nodes in this cluster.
This article references MySQL NDB Cluster setup on Ubuntu 12.04 LTS, with some changes.
Hello I am following your mysql gui to configure a cluster environment, most have some doubts in need DB-nodes have already installed mysql server to configure? and when executing the command ndbd - initial returns the error "ndbd: unknown variable 'user = mysql' 'what can be wrong?
Hmm... kinda looks like your didn't adding a user "mysql" to DB node server, first create mysql group and the mysql user, and the assigned to MySQL group, and then extract the installation files.
Yes I created the mysql group and mysql User, when executing scripts / mysql_install_db - user = mysql - datadir = / usr / local / mysql / data returns this error
please install the perl modules before executing Following a doubt before configuring the ndb storage nodes must have installed the mysql-server?
Hello , I am encountering an error in time to start the mysql , by giving the command " / etc / init.d / mysql.server start " him from error " [ FAIL .... [ .... ] The server quit without updating PID file ( / usr/local/mysql/data/vmndb01.pid ) .... failed! " vmndb01.pid the file looks like this - " 140428 11:49:09 mysqld_safe Starting mysqld daemon with databases from / usr / local / mysql / data
04/28/2014 11:49:28 0 [ Warning] TIMESTAMP DEFAULT with implicit value is deprecated . Please use - explicit_defaults_for_timestamp server option ( see documentation for more details ) .
28.04.2014 11:49:28 5484 [ Note] Plugin ' FEDERATED ' is disabled .
28.04.2014 11:49:29 5484 [ Note] NDB : Changed global value of binlog_format from MIXED to STATEMENT
28.04.2014 11:50:04 5484 [ Warning] NDB : server id set to zero - changes logged to bin log with server id zero will be logged with another server by slave id mysqlds
28.04.2014 11:50:04 5484 [ Note] Starting Cluster Binlog Thread
28.04.2014 11:50:04 5484 [ Note] InnoDB : Using mutexes to ref count buffer pool pages
28.04.2014 11:50:04 5484 [ Note] InnoDB : The InnoDB memory heap is disabled
28.04.2014 11:50:04 5484 [ Note] InnoDB : Mutexes and rw_locks use InnoDB 's own implementation
28.04.2014 11:50:04 5484 [ Note] InnoDB : Compressed tables use zlib 1.2.3
28.04.2014 11:50:04 5484 [ Note] InnoDB : Using Linux native AIO
28.04.2014 11:50:04 5484 [ Note] InnoDB : Not using CPU instructions crc32
28.04.2014 11:50:05 5484 [ Note] InnoDB : Initializing buffer pool , size = 128.0M
InnoDB : mmap (136740864 bytes ) failed ; errno 12
28.04.2014 11:50:05 5484 [ ERROR ] InnoDB : Can not allocate memory for the buffer pool
28.04.2014 11:50:05 5484 [ ERROR ] Plugin ' InnoDB ' init function returned error .
28.04.2014 11:50:05 5484 [ ERROR ] Plugin ' InnoDB ' registration as a STORAGE ENGINE failed .
28.04.2014 11:50:05 5484 [ ERROR ] / usr / local / mysql / bin / mysqld : unknown variable ' NDB - connectstring = 192.168.56.101 '
28.04.2014 11:50:05 5484 [ ERROR ] Aborting
28.04.2014 11:50:05 5484 [ Note] Binlog end
28.04.2014 11:50:05 5484 [ Note] Stopping Cluster Utility thread
28.04.2014 11:50:05 5484 [ Note] Stopping Cluster Binlog
28.04.2014 11:50:05 5484 [ Note] Stopping Cluster Index Stats thread
28.04.2014 11:50:06 5484 [ Note] Shutting down plugin ' partition'
28.04.2014 11:50:06 5484 [ Note] Shutting down plugin PERFORMANCE_SCHEMA '
28.04.2014 11:50:06 5484 [ Note] Shutting down plugin BLACKHOLE '
28.04.2014 11:50:06 5484 [ Note] Shutting down plugin INNODB_SYS_DATAFILES '
28.04.2014 11:50:06 5484 [ Note] Shutting down plugin INNODB_SYS_TABLESPACES '
28.04.2014 11:50:06 5484 [ Note] Shutting down plugin INNODB_SYS_FOREIGN_COLS '
28.04.2014 11:50:06 5484 [ Note] Shutting down plugin INNODB_SYS_FOREIGN '
28.04.2014 11:50:06 5484 [ Note] Shutting down plugin INNODB_SYS_FIELDS '
28.04.2014 11:50:06 5484 [ Note] Shutting down plugin INNODB_SYS_COLUMNS '
28.04.2014 11:50:06 5484 [ Note] Shutting down plugin INNODB_SYS_INDEXES '
28.04.2014 11:50:06 5484 [ Note] Shutting down plugin INNODB_SYS_TABLESTATS '
28.04.2014 11:50:06 5484 [ Note] Shutting down plugin INNODB_SYS_TABLES '
28.04.2014 11:50:06 5484 [ Note] Shutting down plugin INNODB_FT_INDEX_TABLE '
28.04.2014 11:50:06 5484 [ Note] Shutting down plugin INNODB_FT_INDEX_CACHE '
28.04.2014 11:50:06 5484 [ Note] Shutting down plugin INNODB_FT_CONFIG '
28.04.2014 11:50:06 5484 [ Note] Shutting down plugin INNODB_FT_BEING_DELETED '
28.04.2014 11:50:06 5484 [ Note] Shutting down plugin INNODB_FT_DELETED '
28.04.2014 11:50:06 5484 [ Note] Shutting down plugin INNODB_FT_DEFAULT_STOPWORD '
28.04.2014 11:50:06 5484 [ Note] Shutting down plugin INNODB_METRICS '
28.04.2014 11:50:06 5484 [ Note] Shutting down plugin INNODB_BUFFER_POOL_STATS '
28.04.2014 11:50:06 5484 [ Note] Shutting down plugin INNODB_BUFFER_PAGE_LRU '
28.04.2014 11:50:06 5484 [ Note] Shutting down plugin INNODB_BUFFER_PAGE '
28.04.2014 11:50:06 5484 [ Note] Shutting down plugin INNODB_CMP_PER_INDEX_RESET '
28.04.2014 11:50:06 5484 [ Note] Shutting down plugin INNODB_CMP_PER_INDEX '
28.04.2014 11:50:06 5484 [ Note] Shutting down plugin INNODB_CMPMEM_RESET '
28.04.2014 11:50:06 5484 [ Note] Shutting down plugin INNODB_CMPMEM '
28.04.2014 11:50:06 5484 [ Note] Shutting down plugin INNODB_CMP_RESET '
28.04.2014 11:50:06 5484 [ Note] Shutting down plugin INNODB_CMP '
28.04.2014 11:50:06 5484 [ Note] Shutting down plugin INNODB_LOCK_WAITS '
28.04.2014 11:50:06 5484 [ Note] Shutting down plugin INNODB_LOCKS '
28.04.2014 11:50:06 5484 [ Note] Shutting down plugin INNODB_TRX '
28.04.2014 11:50:06 5484 [ Note] Shutting down plugin ' ARCHIVE '
28.04.2014 11:50:06 5484 [ Note] Shutting down plugin ndb_transid_mysql_connection_map '
28.04.2014 11:50:06 5484 [ Note] Shutting down plugin ndbinfo '
28.04.2014 11:50:06 5484 [ Note] Shutting down plugin ' ndbcluster '
28.04.2014 11:50:06 5484 [ Note] Stopping Cluster Index Statistics thread
28.04.2014 11:50:09 5484 [ Note] Shutting down plugin ' MyISAM '
28.04.2014 11:50:09 5484 [ Note] Shutting down plugin ' CSV '
28.04.2014 11:50:09 5484 [ Note] Shutting down plugin MRG_MyISAM '
28.04.2014 11:50:09 5484 [ Note] Shutting down plugin ' MEMORY '
28.04.2014 11:50:09 5484 [ Note] Shutting down plugin sha256_password '
28.04.2014 11:50:09 5484 [ Note] Shutting down plugin mysql_old_password '
28.04.2014 11:50:09 5484 [ Note] Shutting down plugin mysql_native_password '
28.04.2014 11:50:09 5484 [ Note] Shutting down plugin ' binlog '
28.04.2014 11:50:09 5484 [ Note] / usr / local / mysql / bin / mysqld : Shutdown complete
and MGM to run the command ndb_mgm show appears so
Connected to Management Server at : localhost : 1186
cluster Configuration
---------------------
[ ndbd ( NDB ) ] 2 node ( s )
id = [email protected] ( mysql - 5.6.17 ndb - 7.3.5 , NODEGROUP : 0 , * )
id = [email protected] ( mysql - 5.6.17 ndb - 7.3.5 , NODEGROUP : 0 )
[ ndb_mgmd ( MGM ) ] 1 node ( s )
id = [email protected] ( mysql - 5.6.17 ndb - 7.3.5 )
[ mysqld ( API ) ] 2 node ( s )
id = 4 ( not connected , accepting connect from any host )
id = 5 ( not connected , accepting connect from any host )
Hello I have a difficulty to configure the management node to start service in command ndb_mgmd-f / var / lib / mysql-cluster / config.ini - configdir = / var / lib / mysql-cluster / returns the error "bash : / usr / bin / ndb_mgmd no such file or directory "being made to copy the binaries and gave them permission. what can be?
Hello, thanks for this. How to add a storage node ?? I try to do it but i have an error " --Failed to allocate nodeid, error :'Error : Could not alloc node id at 192.168.12.98 port 1186: Connection done from wrong host ip 192.168.12.103.'
I have 2 machines for the management and 4 for the storage. The management machines are perfectly working and the two first storage machines so.
I have this when i try to add 2 others storage machines beacuse i want to make it 4.
Thanks
Hi,
I am following your doc in reference to the installation of mysql cluster.
I am trying to configure mysql 7.3 cluster. but in vain, I am new to mysql db and the clustering scenario.
This might the most stupid Q, you might have heard. please forgive me, if it is.
Do I need to install the mysql server software separately apart from the mysql cluster software.
I
have installed ubuntu 12.0.4 with just bare necessities for the
cluster, during the selections of deb packages i did not choose the
mysql 5.5 server. assuming that the
mysql-cluster-gpl-7.3.5-linux-glibc2.5-x86_64.tar.gz will also be
installing the mysql server.
i have followed the steps of the mgmt
and it seems to be working. now during the creation of database node, i
am struggling to complete the job.
ndb_mgm> show
Connected to Management Server at: localhost:1186
Cluster Configuration
---------------------
[ndbd(NDB)] 2 node(s)
id=3 @172.16.3.227 (mysql-5.6.17 ndb-7.3.5, starting, Nodegroup: 0)
id=4 (not connected, accepting connect from 172.16.3.228)
[ndb_mgmd(MGM)] 2 node(s)
id=1 @172.16.3.225 (mysql-5.6.17 ndb-7.3.5)
id=2 @172.16.3.226 (mysql-5.6.17 ndb-7.3.5)
[mysqld(API)] 2 node(s)
id=5 (not connected, accepting connect from any host)
id=6 (not connected, accepting connect from any host)
now in the node db steps, I went ahead and ran the
mkdir /var/lib/mysql-cluster
cd /var/lib/mysql-cluster
ndbd –-initial /etc/init.d/mysql.server start
It did go through.
But now when I try to set the
root@gngrmysqldb1:~# /usr/local/mysql/bin/mysql_secure_installation
NOTE: RUNNING ALL PARTS OF THIS SCRIPT IS RECOMMENDED FOR ALL MySQL
SERVERS IN PRODUCTION USE! PLEASE READ EACH STEP CAREFULLY!
In order to log into MySQL to secure it, we'll need the current
password for the root user. If you've just installed MySQL, and
you haven't set the root password yet, the password will be blank,
so you should just press enter here.
Enter current password for root (enter for none):
ERROR 2002 (HY000): Can't connect to local MySQL server through socket '/tmp/mysql.sock' (2)
Enter current password for root (enter for none):
ERROR 2002 (HY000): Can't connect to local MySQL server through socket '/tmp/mysql.sock' (2)
Enter current password for root (enter for none):
ERROR 2002 (HY000): Can't connect to local MySQL server through socket '/tmp/mysql.sock' (2)
Unable to connect to the server as root user, giving up.
Please do let me know as to where I am going wrong.
I have dropped the whole server and redid almost 2 to 3 times now, but still the same issue.
Any help will be greatly appreciated.
Note:
There is an error in the proxy configuration that would prevent users from starting the proxy server.
ENABLED="true"
OPTIONS="--defaults-file=/etc/mysql-proxy.conf --plugins=proxy"
should be:
ENABLED="true"
OPTIONS="--defaults-file=/etc/mysql-proxy/mysql-proxy.conf --plugins=proxy"
Helloooo,
I'v a Problem starting the SQL Server, the first time upon '/etc/init.d/mysql.server start' it asks for a Password? is this None or the root Password. Neither one is functional.
I have installed on ubuntu 15.10 with mysql cluster 7.4.8.
something change .
this ssh command's log
https://drive.google.com/file/d/0B7j13l6jGcGGazFnYXdoY216Slk/view?usp=config.ini