
In this post, I will set up Shadowsocks, RedSocks2 and ChinaDNS on OpenWrt, install PandoraBox on Xiaomi MiWiFi Mini.
ShadowSocks
A secure socks5 proxy, designed to protect your Internet traffic. Server side setup reference ShadowSocks Setup Guide.
Official Website shadowsocks.org
OpenWRT
OpenWrt is described as a Linux distribution for embedded devices.
Instead of trying to create a single, static firmware, OpenWrt provides a fully writable filesystem with package management. This frees you from the application selection and configuration provided by the vendor and allows you to customize the device through the use of packages to suit any application. For developer, OpenWrt is the framework to build an application without having to build a complete firmware around it; for users this means the ability for full customization, to use the device in ways never envisioned.
Official Website openwrt.org
PandoraBox
The buildsystem for the OpenWrt Linux distribution. Powered by LuCI, the initial reason for this project was the absence of a free, clean, extensible and easily maintainable web user interface for embedded devices. While most similar configuration interfaces make heavy use of the Shell-scripting language LuCI uses the Lua programming language and splits up the interface into logical parts like models and views, uses object-oriented libraries and templating. That ensures a higher performance, smaller installation size, faster runtimes and what is even more important: better maintainability.
Official Website luci.subsignal.org
RedSocks2
Transparent redirector of any TCP connection to proxy (Customized for Anti-GFW), a modified version of original redsocks. The name is changed to REDSOCKS2 to distinguish with original redsocks. This variant is useful for anti-GFW (Great Fire Wall). REDSOCKS2 contains several new features besides many bug fixes to original redsocks.
Project on GitHub github.com/semigodking/redsocks
ChinaDNS
ChinaDNS automatically queries local DNS servers to resolve Chinese domains and queries foreign DNS servers to resolve foreign domains. It is smart enough to work only with a Chinese IP range file, which doesn't change often.
Project on GitHub github.com/shadowsocks/ChinaDNS
Hardware information and software version in this post
Xiaomi MiWiFi Router
Board   :  Xiaomi mini Board
CPU     :  MTK MT7620A (1 Core 580MHz)
Router Setting
Plug in power and Ethernet cable to one of the Ethernet ports.
Direct browser to 192.168.31.1 or miwifi.com.
The first screen will appear. Press blue button (开始) to get to next screen.
The next screen sets up the wifi network name and password. Note that the wifi password is also used later for access to the browser page (192.168.31.1).
Once you have set this up, plug in WAN cable for access to internet. Internet access also enables the Chrome translation and you can confirm that the router works properly before proceeding.
The next few steps involve first loading the development version of the firmware, then loading a firmware version which provides SSH access with the last step being loading the OpenWrt firmware onto the router.
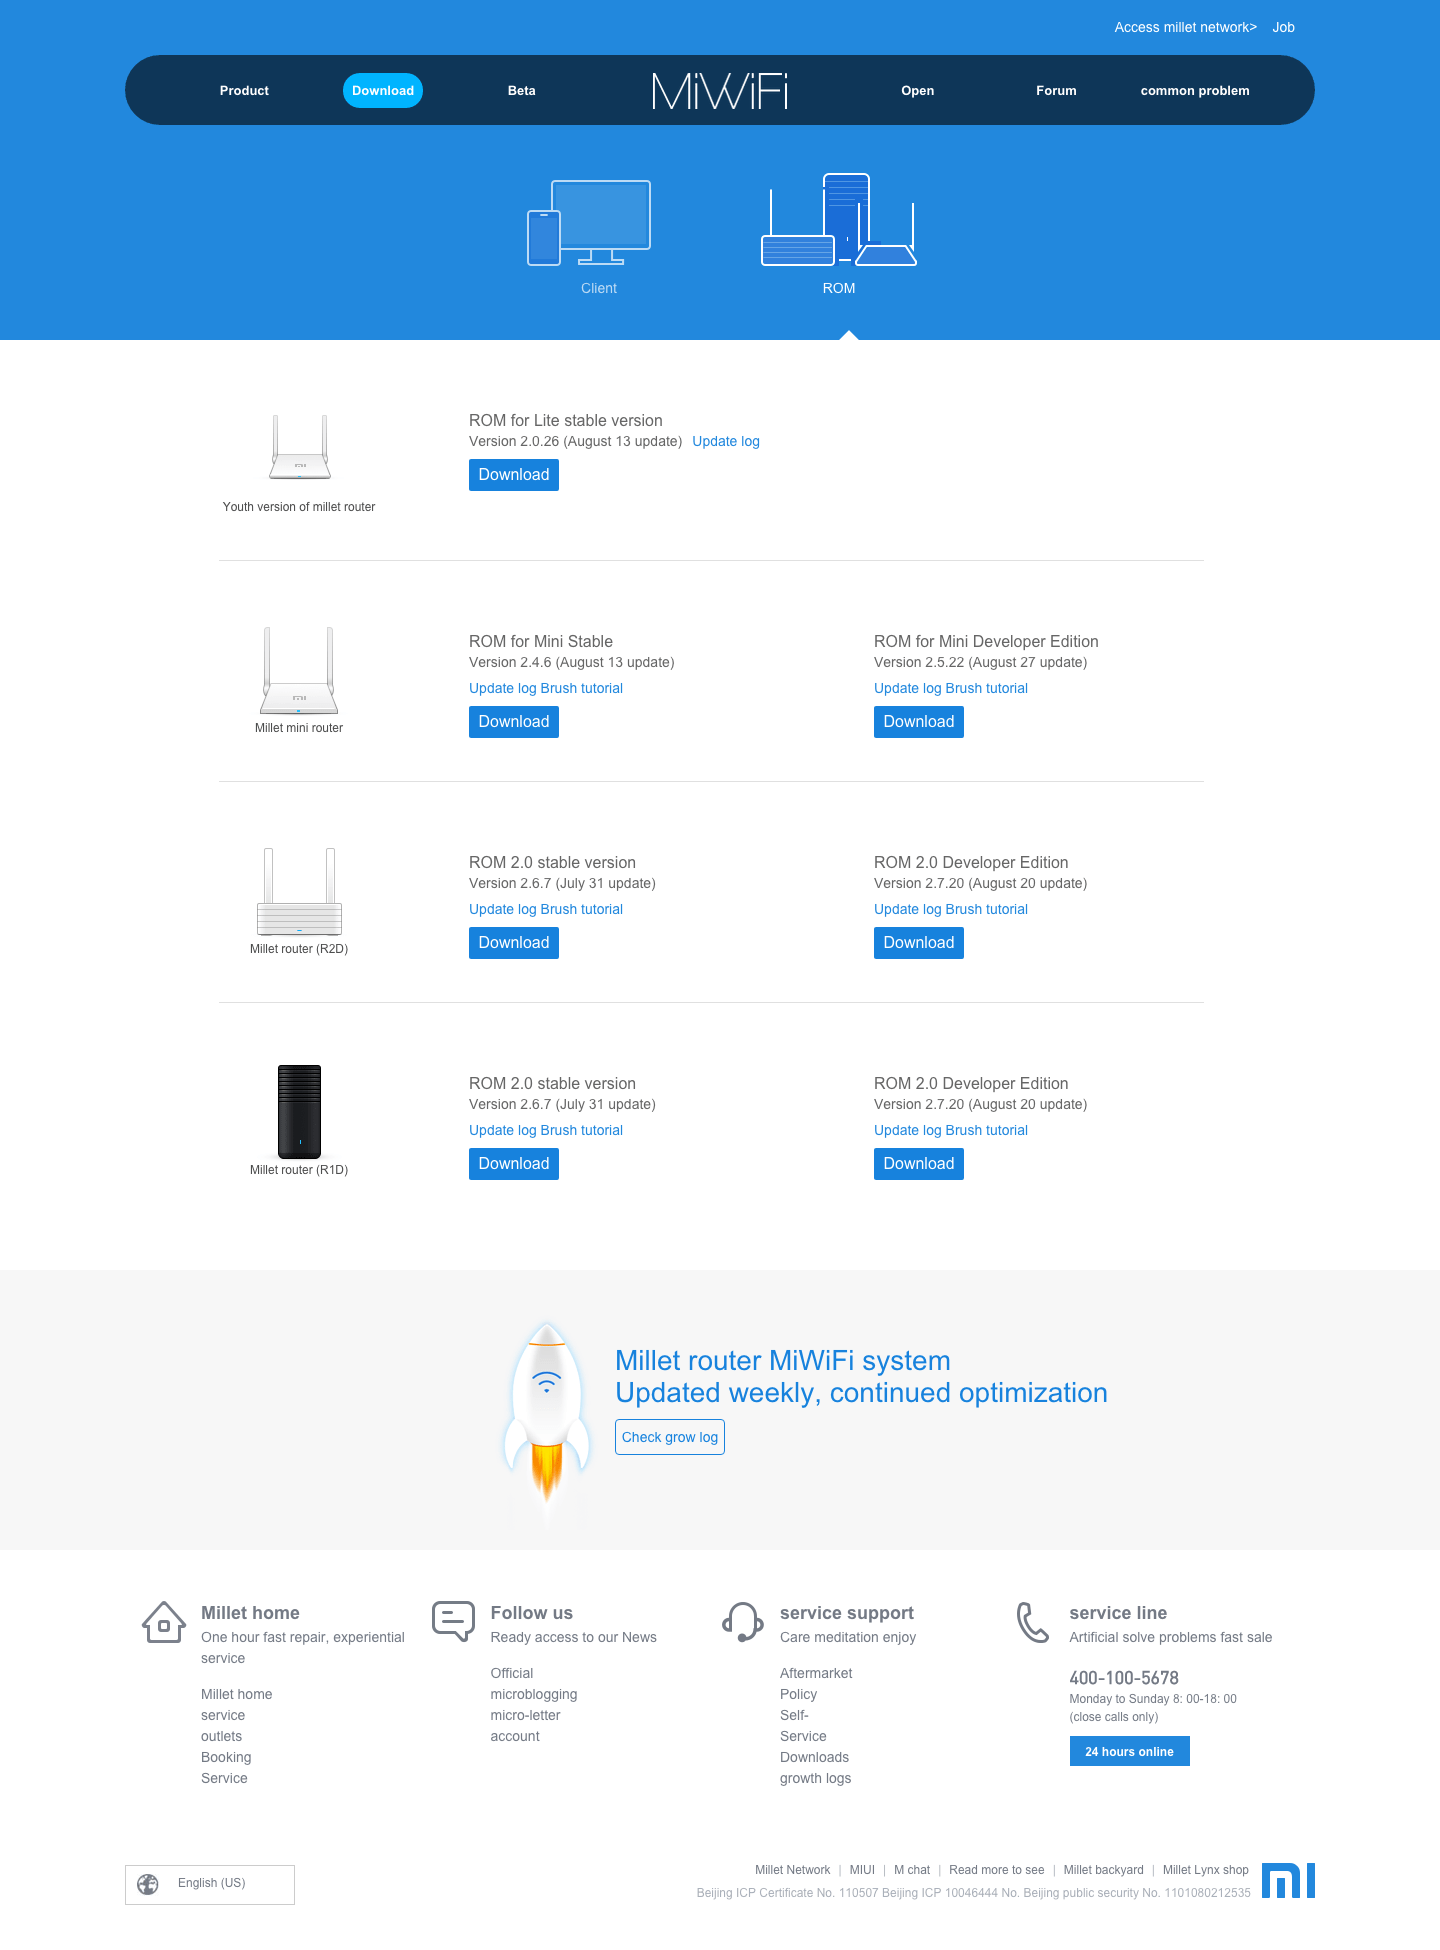
Apparently loading the development version ofthe firmware voids warranty, so beware. Development version can be obtained from www1.miwifi.com/miwifi_download.html. Point to the mini router to get the correct firmware/software. At the same time you can also download the PC Client (although I don't recommend this) and also one of either iOS or Android app. You will NEED one of these to complete the steps. The development ROM that I downloaded was named miwifi_r1cm_firmware_4156a_2.5.22.bin. Apparently the development ROM that is used is important because some of the ROMs may not allow the next step of flashing the SSH firmware. The older ROMs can be found here www.miui.com/thread-1776173-1-1.html. Try to use the development ROM that has been proven to allow the next step of the process.
The above downloads the Chinese versions of PC Client and iOS/Android apps. To get the translated software follow these links. The iOS/Android are necessary because they are used to link the hardware to the miwifi account that you are about to set up. Without the link, the SSH version of the ROM (and SSH password) will not be available.
Create and activate a new account at Xiaomi account.xiaomi.com/pass/register. When you have setup the account and logged in, remember the User ID. You will note that there is no device associated with the account. The association has to be done via theiOS/Android app. Unfortunately there does not seem to be a way to do that via the PC Client, which is why I do not recommend installing this.
Using your iOS or Android device, open the app. Login using the ID and password in the step above. The account then recognises the Xiaomi mini router device. This is required for the SSH firmware.
To get the SSH firmware proceed to www1.miwifi.com/miwifi_open.html. Halfway down the page there is a SSH button.

Click on the button and sign into the Xiaomi account when requested. After signing in you will be presented with a page to download the SSH firmware. Also note the SSH password for root user in the middle of the page. The SSH firmware will have the name miwifi_ssh.bin
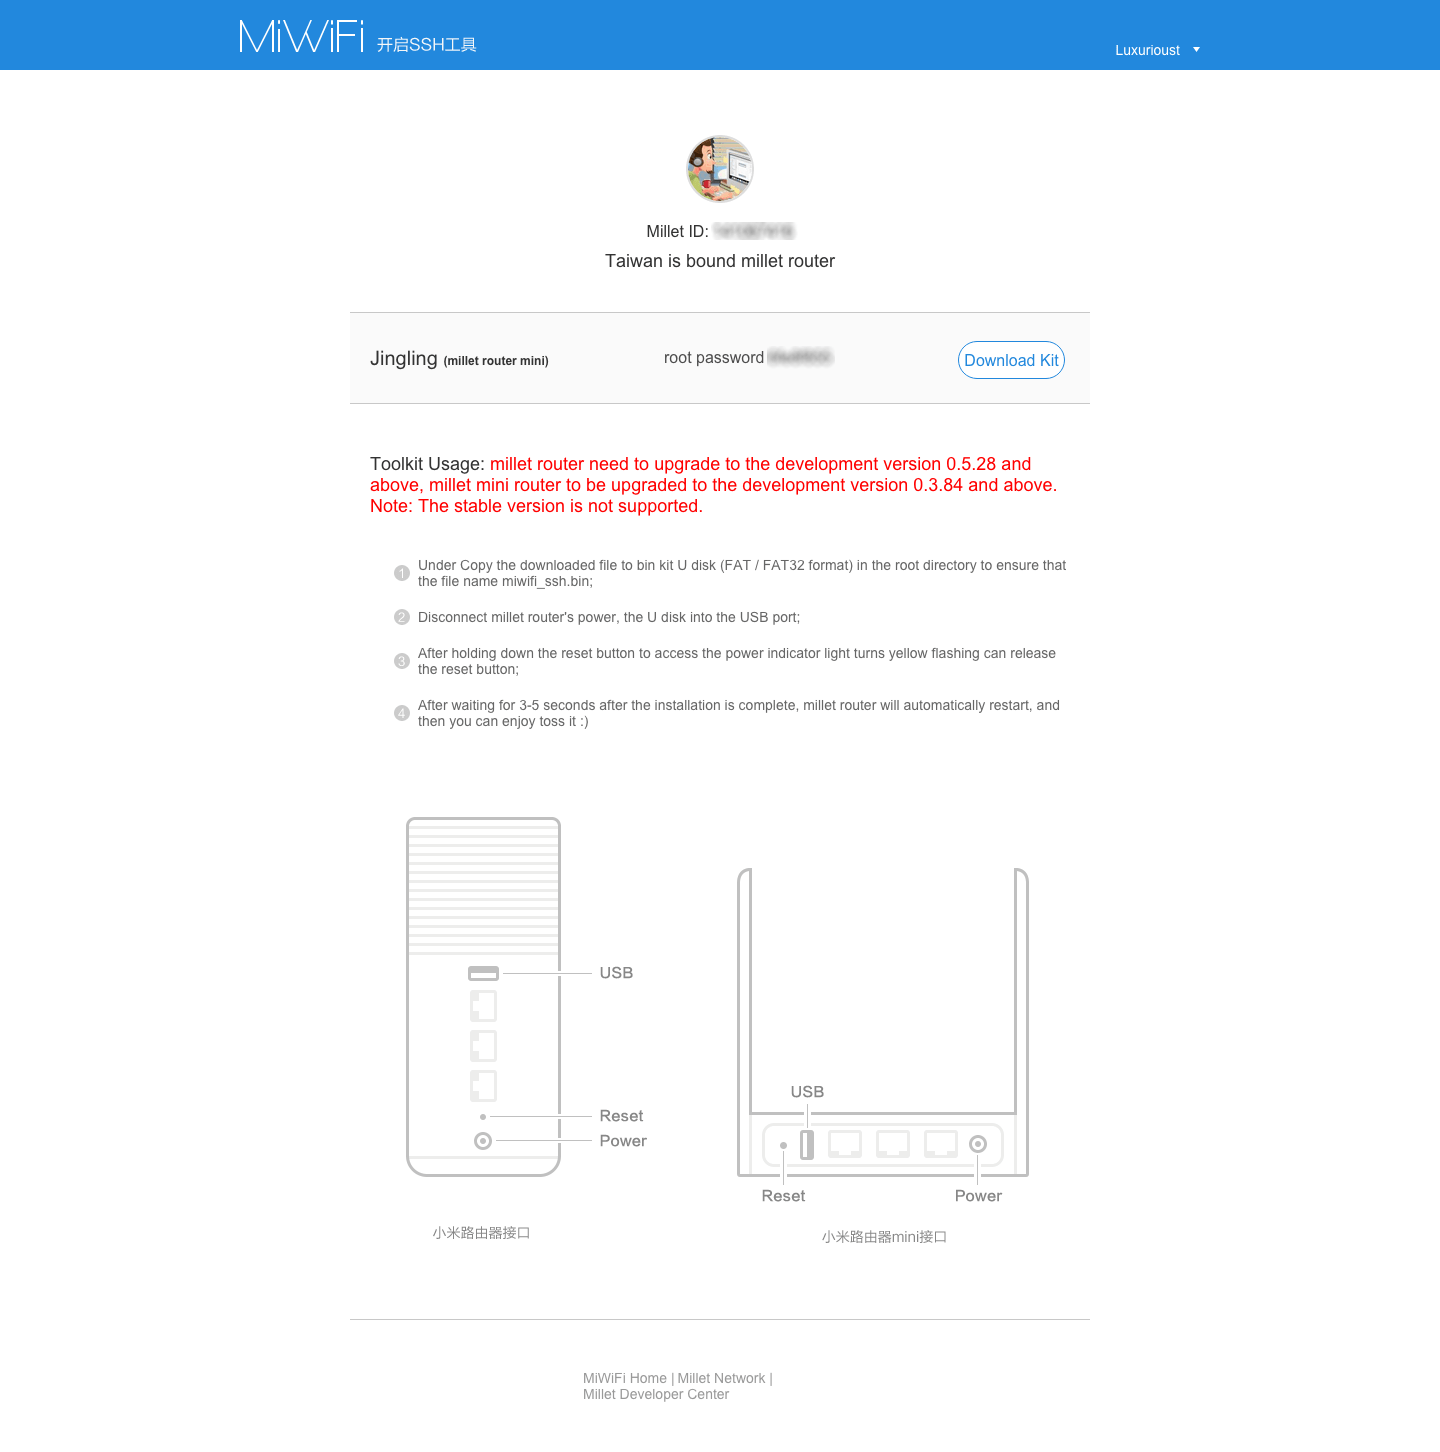
Now that you have all the firmware, it is just a matter of flashing in the correct sequence. First off, get an empty USB drive and format to FAT or FAT32.
Copy the development firmware into the USB drive.
The development firmware and SSH firmware flash both follows the same procedure
- Pull the power from router, at the router
- Plug USB drive into router.
- Press reset button (in the hole to the left ofthe USB drive)
- While holding down the reset button, plug in the power. The orange light in front of the router will remain steady for a short while before it starts flashing
- Once the orange light starts flashing, releasethe reset button and sit back until the light in front of the router turns blue. Also if there are indicator lights on your USB drive, they will flash as the drive is being read. If the orange light does not flash, try with another USB drive and confirm that the drive is formatted to FAT or FAT32.
The router can be re-set up between each flash just to confirm that it is working, but I generally just flash the firmwares one after the other.
The SSH firmware do not have to be renamed for the flash. Just keep the name as miwifi_ssh.bin.
Once the SSH firmware has been successfully flashed, confirm SSH via port 22, username root and password as noted from download download the SSH firmware page.
The OpenWRT firmware will need to be downloaded from downloads.openwrt.org.cn/PandoraBox/Xiaomi-Mini-R1CM/testing. I used the latest version PandoraBox-ralink-mt7620-xiaomi-mini-squashfs-sysupgrade-r1216-20150721.bin.
Transfer PandoraBox-ralink-mt7620-xiaomi-mini-squashfs-sysupgrade-r1216-20150721.bin to the /tmp directory in the root of the router drive using 192.168.31.1, Port 22
$ scp PandoraBox-ralink-* [email protected]:/tmp
Connect to the router using 192.168.31.1, Port 22, via SSH or putty (Microsoft Windows).
Change to the /tmp directory and confirming that the PandoraBox-ralink-mt7620-xiaomi-mini-squashfs-sysupgrade-r1216-20150721.bin file is listed.
# ls -l /tmp
Finally flash the OpenWRT firmware.
# mtd -r write /tmp/PandoraBox-ralink-* OS1
or
# mtd -r write /tmp/PandoraBox-ralink-* firmware
The router will reboot once it has been successfully flashed.
Re-connect Wifi AP named PandoraBox_* and access the OpenWRT router via 192.168.1.1 on your browser. Default account username will be root and password admin.
BusyBox v1.22.1 (2015-07-09 13:52:12 CST) built-in shell (ash)
Enter 'help' for a list of built-in commands.


  _______________________________________________________________
 |    ____                 _                 ____               |
 |   |  _ \ __ _ _ __   __| | ___  _ __ __ _| __ )  _____  __   |
 |   | |_) / _` | '_ \ / _` |/ _ \| '__/ _` |  _ \ / _ \ \/ /   |
 |   |  __/ (_| | | | | (_| | (_) | | | (_| | |_) | (_) >  <    |
 |   |_|   \__,_|_| |_|\__,_|\___/|_|  \__,_|____/ \___/_/\_\   |
 |                                                              |
 |                  PandoraBox SDK Platform                     |
 |                  The Core of SmartRouter                     |
 |       Copyright 2013-2015 D-Team Technology Co.,Ltd.SZ       |
 |                http://www.pandorabox.org.cn                  |
 |______________________________________________________________|
  Base on OpenWrt BARRIER BREAKER (14.09, r1216)
[root@PandoraBox_57B7:/root]#
Setup opkg Source
Backup config file
# mv /etc/opkg.conf /etc/opkg.conf.bak
Edit opkg config file
# vim /etc/opkg.conf
Add following source
dest root /
dest ram /tmp
lists_dir ext /etc/opkg-lists
option overlay_root /overlay
# notice
dest usb /mnt/sdb1/opkg

arch all 100
arch ramips_24kec 200
arch ramips 300
arch mips 400
arch unkown 500

src/gz barrier_breaker_base http://downloads.openwrt.org/barrier_breaker/14.07/ramips/mt7620a/packages/base
src/gz barrier_breaker_luci http://downloads.openwrt.org/barrier_breaker/14.07/ramips/mt7620a/packages/luci
src/gz barrier_breaker_management http://downloads.openwrt.org/barrier_breaker/14.07/ramips/mt7620a/packages/management
src/gz barrier_breaker_oldpackages http://downloads.openwrt.org/barrier_breaker/14.07/ramips/mt7620a/packages/oldpackages
src/gz barrier_breaker_packages http://downloads.openwrt.org/barrier_breaker/14.07/ramips/mt7620a/packages/packages
src/gz barrier_breaker_routing http://downloads.openwrt.org/barrier_breaker/14.07/ramips/mt7620a/packages/routing
src/gz barrier_breaker_telephony http://downloads.openwrt.org/barrier_breaker/14.07/ramips/mt7620a/packages/telephony

src/gz openwrt_dist http://openwrt-dist.thankgfw.ml/releases/ramips/packages
src/gz openwrt_dist_luci http://openwrt-dist.thankgfw.ml/releases/luci/packages
Save and update source list and install curl, wget, libpolarssl and redsocks2
# opkg update
# opkg install curl wget libpolarssl redsocks2
Download and install following package with curl or download from website
shadowsocks-libev sourceforge.net/projects/openwrt-dist/files/shadowsocks-libev
chinadns-openwrt sourceforge.net/projects/openwrt-dist/files/chinadns
luci-app-chinadns sourceforge.net/projects/openwrt-dist/files/luci-app/chinadns
redsocks2 sourceforge.net/projects/openwrt-dist/files/redsocks2
luci-app-redsocks2 sourceforge.net/projects/openwrt-dist/files/luci-app/redsocks2
# cd /tmp
# wget http://jaist.dl.sourceforge.net/project/openwrt-dist/shadowsocks-libev/2.1.4-87ec497/ramips/shadowsocks-libev-spec_2.1.4-1_ramips_24kec.ipk
# wget http://jaist.dl.sourceforge.net/project/openwrt-dist/chinadns/1.3.2-21cb752/ChinaDNS_1.3.2-1_ramips_24kec.ipk
# wget http://iweb.dl.sourceforge.net/project/openwrt-dist/luci-app/chinadns/luci-app-chinadns_1.3.4-1_all.ipk
# wget http://jaist.dl.sourceforge.net/project/openwrt-dist/redsocks2/0.60-769a5b0/redsocks2_0.60-2_ramips_24kec.ipk
# wget http://jaist.dl.sourceforge.net/project/openwrt-dist/luci-app/redsocks2/luci-app-redsocks2_1.3.0-1_all.ipk
# opkg install shadowsocks-libev-spec*
# opkg install ChinaDNS*
# opkg install luci-app-chinadns*
# opkg install redsocks2*
# opkg install luci-app-redsocks2*
Setup ShadowSocks Client
Config ShadowSocks client config file /etc/shadowsocks.json like this
{
    "server"        : "X.X.X.X",
    "server_port"   : 8388,
    "local"         : "0.0.0.0",
    "local_port"    : 1080,
    "password"      : "password",
    "timeout"       : 60,
    "method"        : "rc4-md5"
}
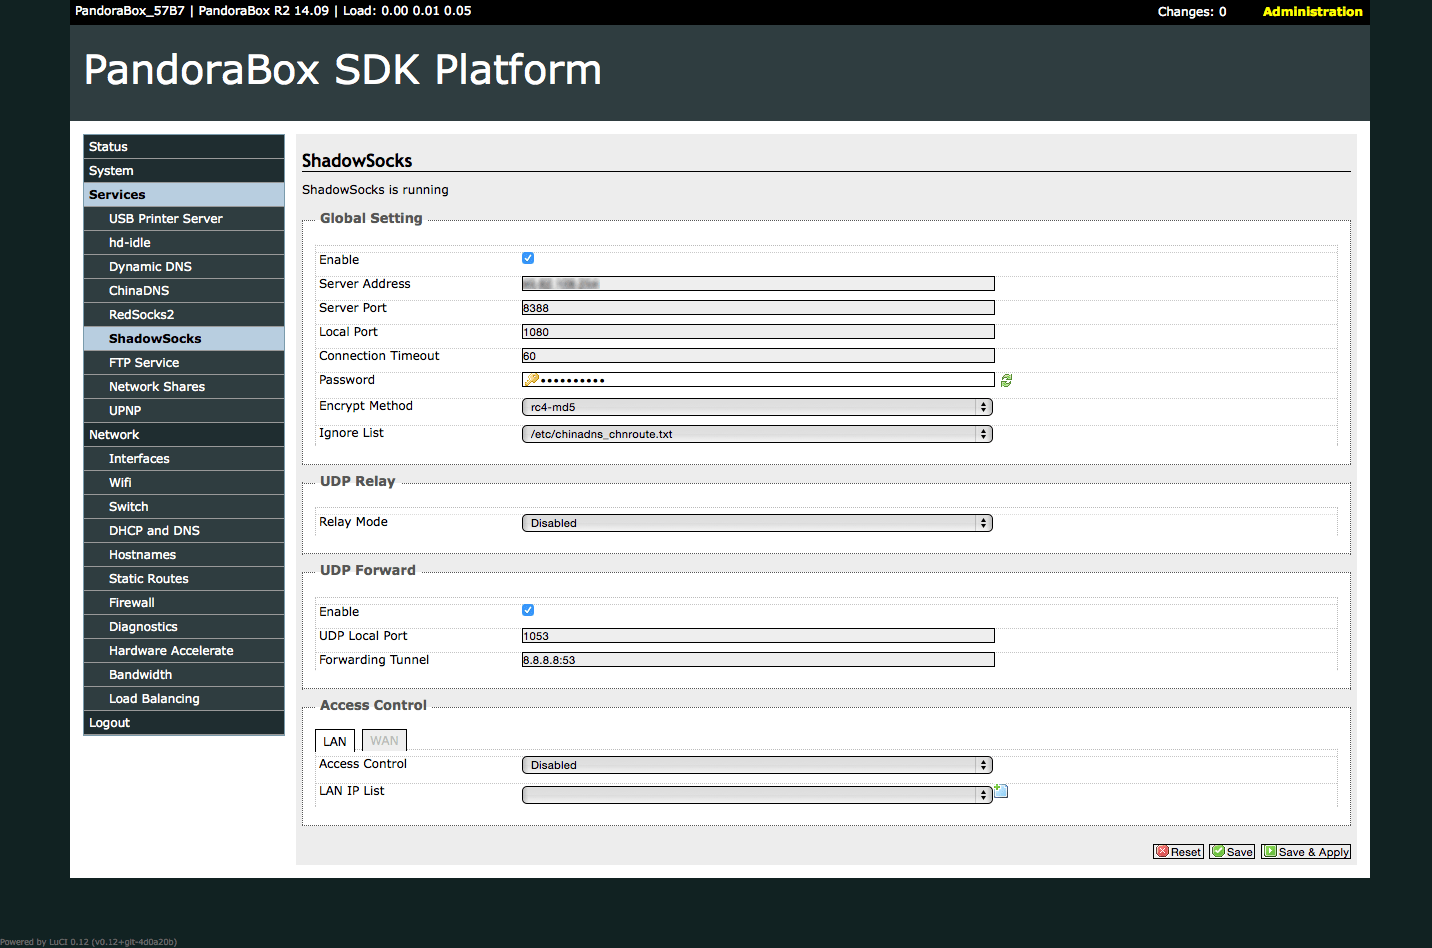
Enable and restart ShadowSocks service
# /etc/init.d/shadowsocks enable
# /etc/init.d/shadowsocks start
Setup UDP Relay: Relay Mode disable, UDP: Forward enable, UDP Local Port 1053, Forwarding Tunnel 8.8.8.8:53 on Luci → Services → ShadowSocks and click Save & Apply button.
Setup Redsocks2
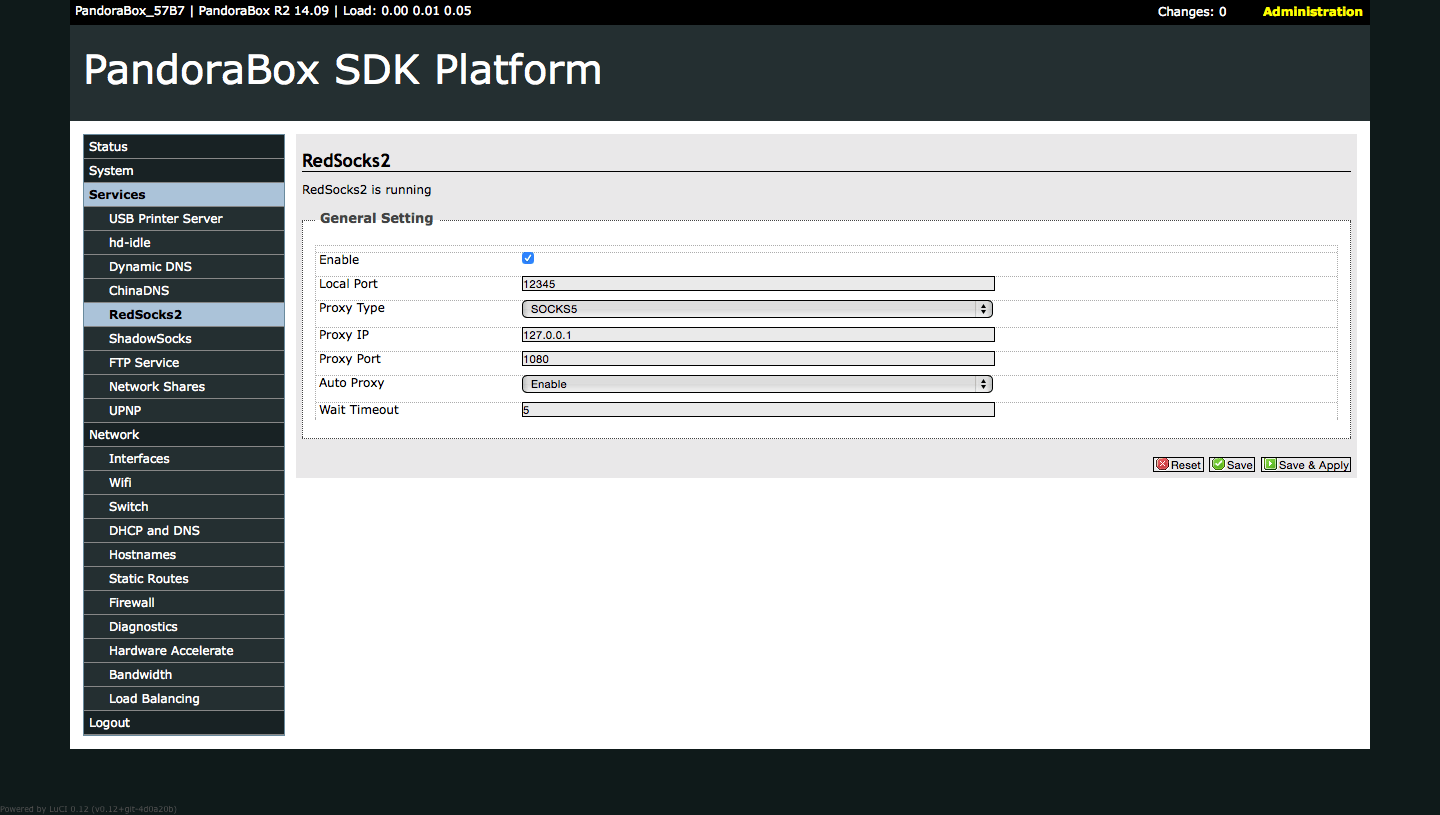
Luci → Services → Redsocks2, config params like following and click Save & Apply button.
Enable          : Checked
Local Port      : 12345
Proxy Type      : SOCKS5
Proxy IP        : 127.0.0.1
Proxy Port      : 1080
Auto Proxy      : Enable
Wait Timeout    : 5
Redsocks2 config file /etc/init.d/redsocks2, if we wanna to only allow 80 and 443 port connection via redsocks2 service, replace -A REDSOCKS2 -p tcp -j REDIRECT --to-ports $local_port with
-A REDSOCKS2 -p tcp --dport 80 -j REDIRECT --to-ports $local_port
-A REDSOCKS2 -p tcp --dport 443 -j REDIRECT --to-ports $local_port
in config file, and restart service
# /etc/init.d/redsocks2 restart
Setup ChinaDNS
Luci → Services → ChinaDNS, config params like following
Enable                      : Checked
Enable Bidirectional Filter : Checked
Local Port                  : 5353
CHNRoute File               : /etc/chinadns_chnroute.txt
Upstream Servers            : 114.114.114.114,8.8.8.8
Click Save & Apply button, if service not running, using chinadns command and check config file /etc/init.d/chinadns.
/etc/init.d/chinadns enable
/etc/init.d/chinadns start

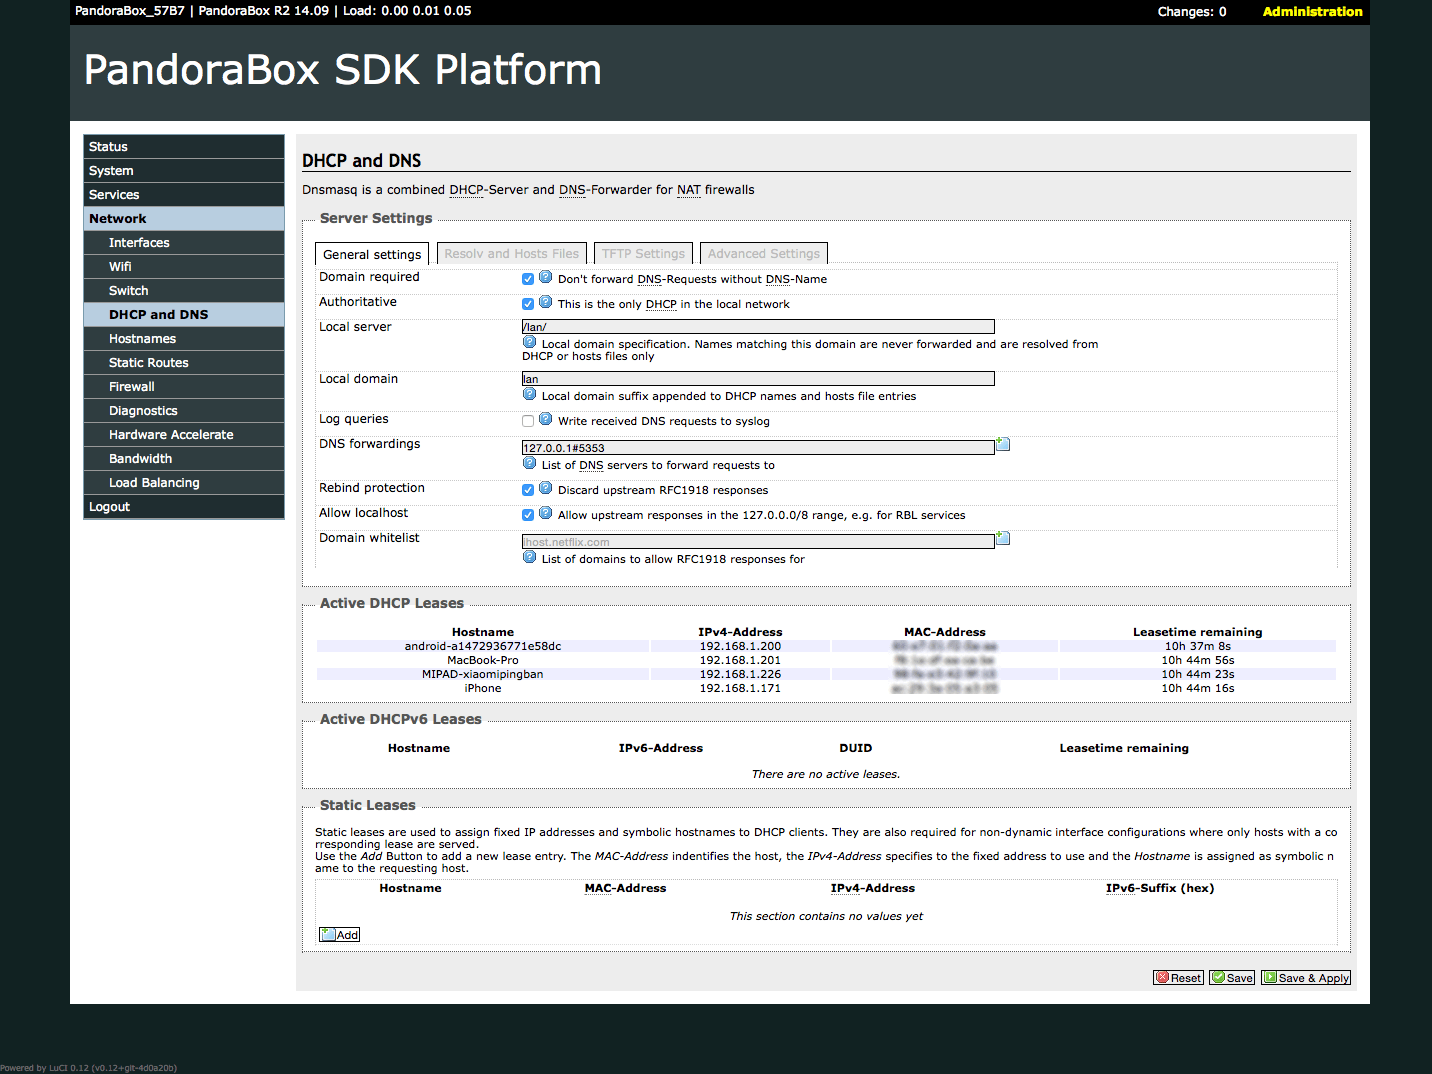
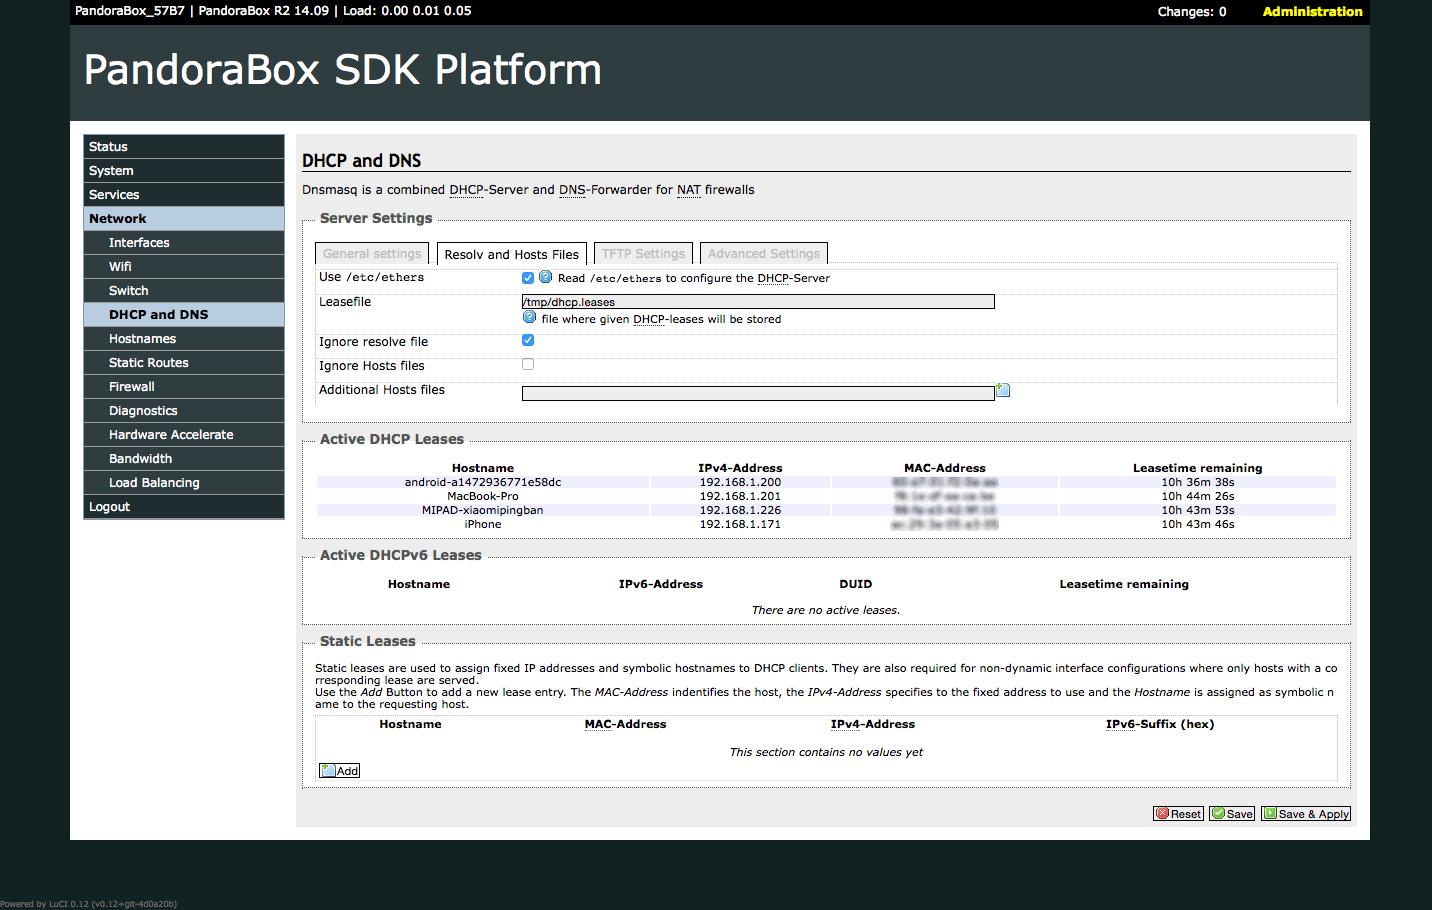
Setup DHCP and DNS
Luci → Network → DHCP and DNS, config params like following and click Save & Apply button.
General settings
DNS forwardings : 127.0.0.1#5353

Resolv and Hosts Files
Ignore resolve file : Checked
the content you changed in opkg.conf will cause some problems like:
Package mtd-utils-ubirsvol version 1.5.0-2 has no valid architecture, ignoring.
Package mtd-utils-ubiupdatevol version 1.5.0-2 has no valid architecture, ignoring.
Package mtd-utils version 1.5.0-2 has no valid architecture, ignoring.
Package multiwan version 1.0.22-2 has no valid architecture, ignoring.
...
why you change the file opkg.conf?
Because my local network connection make some problems, I can't download some packages, so I changed the that file, if you can normally use, please ignore modify this file.
The shadowsocks is exist in r1216 of Pandorabox, when opkg install shadowsocks-libev-spec* will alse cause some problems i tested...
Hey Ri Xu,
Thanks for the tutorial.
What speeds are you able to get with this setup?
Where should I setup my shadowsocks server?