
Introduction
OCserv is the OpenConnect VPN server. Its purpose is to be a secure, small, fast and configurable VPN server. It implements the OpenConnect SSL VPN protocol, and has also (currently experimental) compatibility with clients using the AnyConnect SSL VPN protocol. The OpenConnect protocol provides a dual TCP/UDP VPN channel, and uses the standard IETF security protocols to secure it. The server is implemented primarily for the GNU/Linux platform but its code is designed to be portable to other UNIX variants as well. From Ubuntu 16.04 onward, OCserv is included in the standard Ubuntu repositories, so you do not need to compile it from source. In this tutorial the iOS 12.2 client, which could be an iPad or an iPhone, will connect to the VPN server using the Cisco AnyConnect VPN client.
Install packages on server
Log on to your server and install the OCserv package:
$ sudo apt-get install build-essential autogen pkg-config
$ sudo apt-get install libtalloc-dev libreadline-dev libpam0g-dev libhttp-parser-dev libpcl1-dev
$ sudo apt-get install libgnutls28-dev libev-dev
$ sudo apt-get install libprotobuf-c-dev libhttp-parser-dev
$ apt-get install libgeoip-dev # Debian9 required
$ sudo apt-get install libseccomp-dev
We will also need the GnuTLS package, since we use the GnuTLS utilities to generate our public key infrastructure (keys and certificates):
$ sudo apt-get install gnutls-bin
Build and Install
$ wget ftp://ftp.infradead.org/pub/ocserv/ocserv-0.12.3.tar.xz
$ tar Jxvf ocserv-0.12.3.tar.xz
$ cd ocserv-0.12.3
$ ./configure --prefix=/usr --sysconfdir=/etc
$ make && sudo make install
We can use self-signed certificates or using a purchased commercial certificate from CA certificate providers, such as Comodo, StartSSL, WoSign and etc.
Make CA certificate and server certificate
The GnuTLS certificate tool (certtool) allows you to specify the fields for your certificates in a configuration template file.
Start by creating a configuration template file for your Certificate Authority (CA) certificate:
$ cd /etc/ocserv
$ sudo vim ca.tmpl
Press the I key on your keyboard to enter insert mode.
Enter the following fields into the CA configuration file, customizing the values as you prefer:
cn = "My CA"
organization = "My Org"
serial = 1
expiration_days = 3650
ca
signing_key
cert_signing_key
crl_signing_key
When you have finished entering the above, escape from insert mode, write the file to disk, and quit the editor.
Now generate a key and certificate for your CA, using the CA configuration template file you just created:
$ sudo certtool --generate-privkey --outfile ca-key.pem
$ sudo certtool --generate-self-signed --load-privkey ca-key.pem \
    --template ca.tmpl --outfile ca-cert.pem
Now create a server certificate template file:
$ sudo vim server.tmpl
Press the I key on your keyboard to enter insert mode.
Enter the following fields into the server configuration file. Note that in the common name (cn) field, you must specify your actual server IP address or hostname (shown as vpn.xuri.me in the example that follows):
cn = "vpn.xuri.me"
organization = "My Org"
expiration_days = 3650
signing_key
encryption_key
tls_www_server
When you have finished entering the above, escape from insert mode, write the file to disk, and quit the editor.
Generate the server key and certificate, using the configuration template file:
$ sudo certtool --generate-privkey --outfile server-key.pem
$ sudo certtool --generate-certificate --load-privkey server-key.pem \
    --load-ca-certificate ca-cert.pem --load-ca-privkey ca-key.pem \
    --template server.tmpl --outfile server-cert.pem
Use commercial certificate
For example I use WoSign Free SSL Certificates. I got 1_vpn.xuri.me_bundle.crt and 2_vpn.xuri.me.key two files. Convert .crt certificate to .pem format:
$ openssl x509 -in 1_vpn.xuri.me_bundle.crt -out server-cert.pem -outform PEM
Convert .key file to .pem format:
$ cat 2_vpn.xuri.me.key > server-key.pem
Put server-cert.pem and server-key.pem on path /etc/ocserv/, and set file permission 600.
If you are use CA certificates issued by StartSSL, you have got certificate cert.crt file, I some case you should create certificate chain and merge sub certificate and root certificate like this:
$ wget http://cert.startssl.com/certs/ca.pem
$ wget http://cert.startssl.com/certs/sub.class1.server.ca.pem
$ cat cert.crt sub.class1.server.ca.pem ca.pem > server-cert.pem
Generate Certificates with Let's Encrypt
Confirm the port in the file /lib/systemd/system/ocserv.socket not used by other program, and generate certificates by certbot:
$ sudo apt-get install software-properties-common
$ sudo add-apt-repository ppa:certbot/certbot
$ sudo apt-get update
$ sudo apt-get install certbot
$ sudo certbot certonly
Saving debug log to /var/log/letsencrypt/letsencrypt.log
How would you like to authenticate with the ACME CA?
- - - - - - - - - - - - - - - - - - - - - - - - - - - - - - - - - - - - - - - -
1: Spin up a temporary webserver (standalone)
2: Place files in webroot directory (webroot)
- - - - - - - - - - - - - - - - - - - - - - - - - - - - - - - - - - - - - - - -
Select the appropriate number [1-2] then [enter] (press 'c' to cancel):
Select 1 and input domain name, certificates file located at /etc/letsencrypt/live/vpn.xuri.me/fullchain.pem, /etc/letsencrypt/live/vpn.xuri.me/privkey.pem.
Configure the OpenConnect VPN server
Edit the OCserv sample configuration file that is provided in /etc/ocserv:
$ sudo vim ocserv.conf
Use the editor to comment out (#) the default values and replace them with those shown in the example that follows:
#auth = "pam[gid-min=1000]"
auth = "plain[passwd=/etc/ocserv/ocpasswd]"

#server-cert = /etc/ssl/certs/ssl-cert-snakeoil.pem
#server-key = /etc/ssl/private/ssl-cert-snakeoil.key
server-cert = /etc/ocserv/server-cert.pem
server-key = /etc/ocserv/server-key.pem

#try-mtu-discovery = false
try-mtu-discovery = true

default-domain = vpn.xuri.me

#dns = 192.168.1.2
dns = 8.8.8.8

# Comment out all route fields
#route = 10.10.10.0/255.255.255.0
#route = 192.168.0.0/255.255.0.0
#route = fef4:db8:1000:1001::/64

#no-route = 192.168.5.0/255.255.255.0

cisco-client-compat = true

tcp-port = 443
udp-port = 443
When you have finished entering the above, escape from insert mode, write the file to disk, and quit the editor.
Create user id and password
Generate a user id and password that you will use to authenticate from AnyConnect to OCserv. For example, if you want your user id to be xuri:
$ sudo ocpasswd -c /etc/ocserv/ocpasswd xuri
You will be prompted to enter a password twice. The password will not be displayed on your terminal:
Enter password:
Re-enter password:
Enable packet forwarding
Allow forwarding in the Linux kernel by editing the system control configuration file:
$ sudo vim /etc/sysctl.conf
Delete the # sign at the start to uncomment the line:
net.ipv4.ip_forward=1
Write the file to disk and quit the editor, and make this change active now:
$ sudo sysctl -p
Open firewall
Open the server firewall for SSL:
$ sudo iptables -I FORWARD -p tcp --tcp-flags SYN,RST SYN -j TCPMSS --clamp-mss-to-pmtu
$ sudo iptables -A INPUT -p tcp --dport 443 -j ACCEPT
$ sudo iptables -A INPUT -p udp --dport 443 -j ACCEPT
Enable network address translation (NAT):
$ sudo iptables -t nat -A POSTROUTING -j MASQUERADE
Assuming you have already installed iptables-persistent, reconfigure it to make your changes persist across server reboots:
$ sudo dpkg-reconfigure iptables-persistent
Start OpenConnect VPN server
Check that nothing is already listening on port 443:
$ sudo lsof -i
The command sudo lsof -i then showed systemd listening to port 443 on IPv6. I do not know why systemd was doing this. The command systemctl -all list-sockets showed the related unit as ocserv.socket. The solution was to issue the command sudo systemctl stop ocserv.socket.
Start OCserv:
$ sudo ocserv -c /etc/ocserv/ocserv.conf
or
$ sudo ocserv
Check that it is now listening on port 443 with the command:
$ sudo netstat -tulpn | grep 443
$ ocserv -f -d 1
Optimization
Add ocserv to system service:
$ cd /etc/init.d
$ sudo ln -s /lib/init/upstart-job ocserv
$ cd /etc/init
$ vi  ocserv.conf
Write the following script in the configuration file:
#!upstart
description "OpenConnect Server"

start on runlevel [2345]
stop on runlevel [06]

respawn
respawn limit 20 5

script
    exec start-stop-daemon --start --pidfile /var/run/ocserv.pid --exec /usr/local/sbin/ocserv -- -f >> /dev/null 2>&1
end script
Now we can use service ocserv start and service ocserv stop to control the service.
Smart shunt
Set up no-route in the configuration file by your own rules.
Make CA certificate available for download
Your client such as Mac, iPad or iPhone needs to be able to validate the server certificate. To allow it to do this, you must install your CA certificate on the iPad or iPhone as a trusted root certificate. The first step in this is to make the CA certificate available for download from your server.
Open the firewall so that you can reach the server from a browser:
$ sudo iptables -A INPUT -p tcp --dport 80 -j ACCEPT
Install Apache:
$ sudo apt-get install apache2
Copy the CA certificate into the web root folder:
$ sudo cp /etc/ocserv/ca-cert.pem /var/www/html
Download and install CA certificate
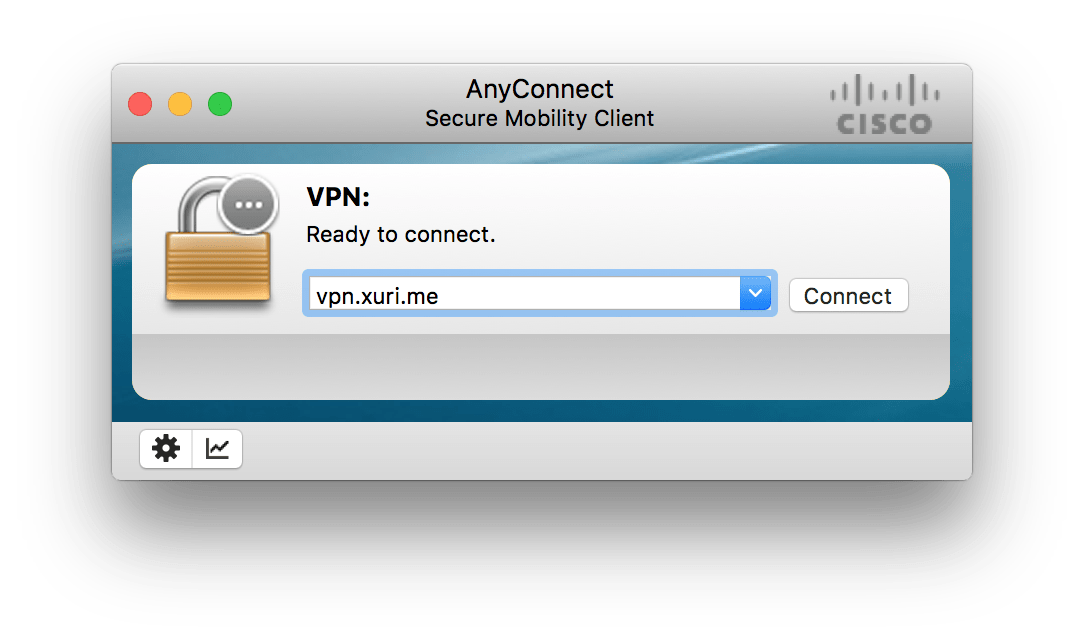
Connect OCserv on Mac
Download and install Cisco AnyConnect Secure Mobility Client for OS X with last version. Add your server IP address (e.g. vpn.xuri.me):
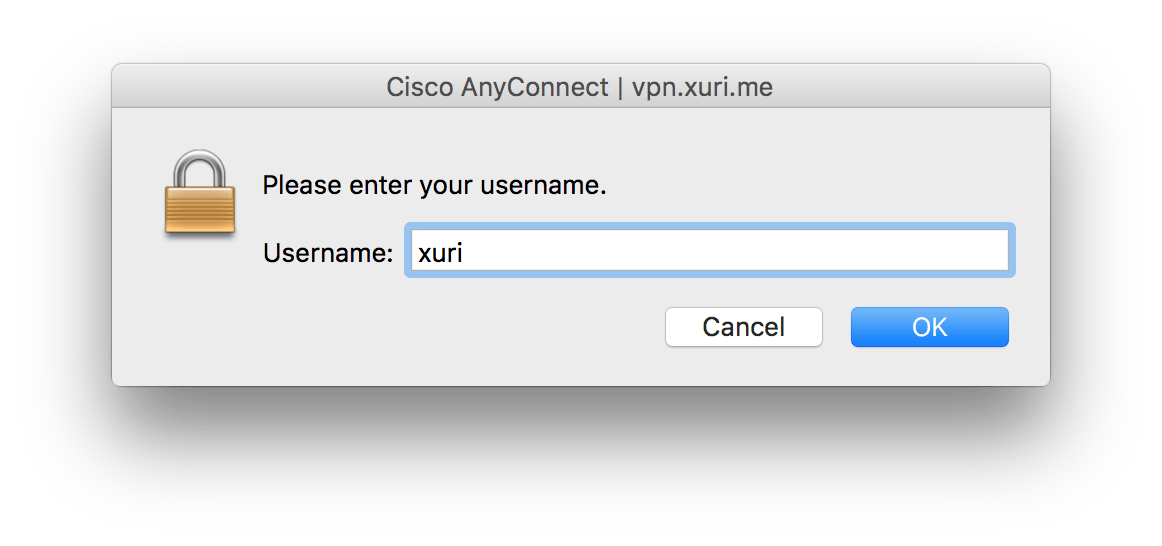
Enter your username:
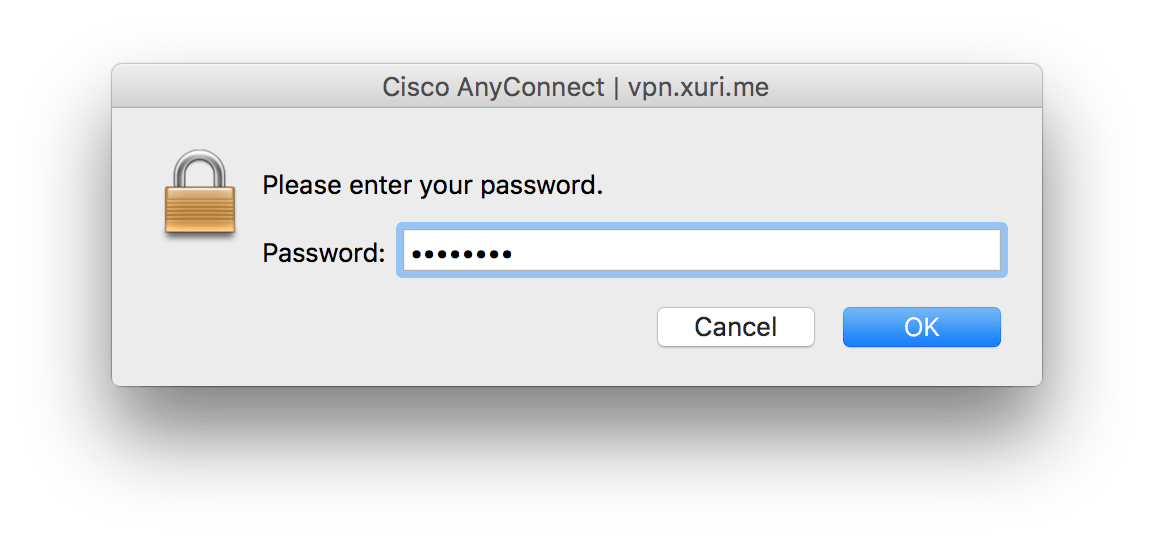
Enter your password:
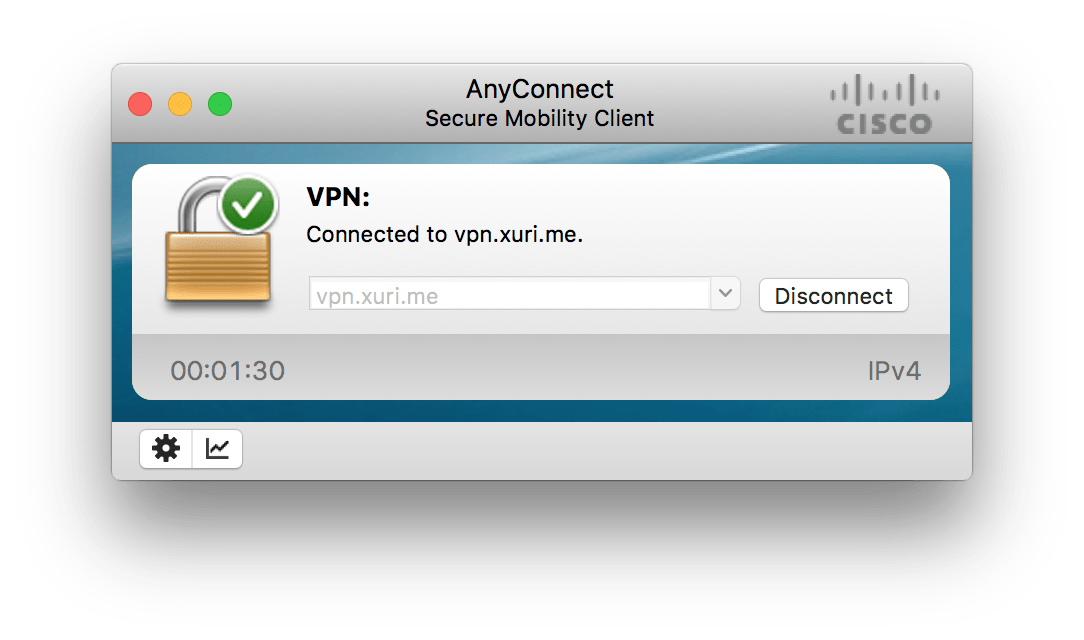
Connect to VPN
Connect OCserv on mobile client
Now go to your iOS device (iPad or iPhone).
Open the Safari browser.
Browse to the location of the CA certificate at your server’s IP address. For example, if your server is located at vpn.xuri.me, then in Safari you would browse to:
http://vpn.xuri.me/ca-cert.pem
Follow the prompts to install the CA certificate as a "Profile" on your iOS 12.2 device.
Once the "Profile" (i.e., certificate) is installed, tap on Done:

Install AnyConnect on iOS 12.2 client
On your iPad or iPhone, open the the App Store, and search for Cisco AnyConnect or desktop client.
Configure AnyConnect on iOS 12.2 client
Open the AnyConnect app.
Tap on Connections.
Tap on Add VPN Connection.
- Description is whatever you want
- Server Address is your server IP address (e.g.
vpn.xuri.me)
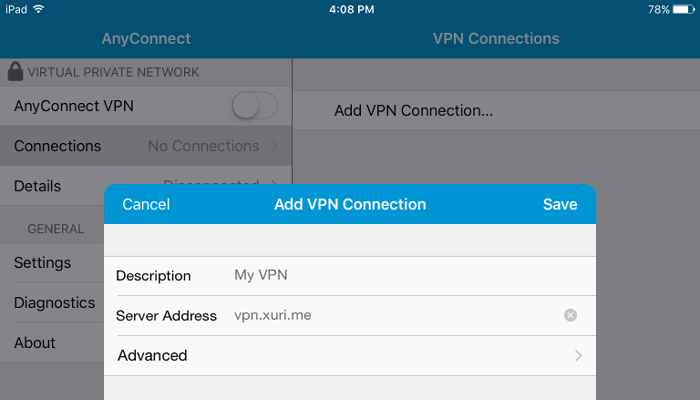
Tap Save.
Connect to VPN
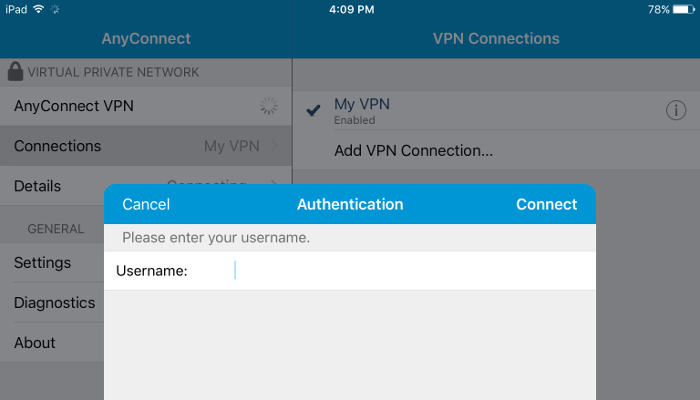
Now connect from your iPad or iPhone to your VPN.
You will be prompted to enter your username (the one you set up with ocpasswd a few minutes ago, for example, xuri):
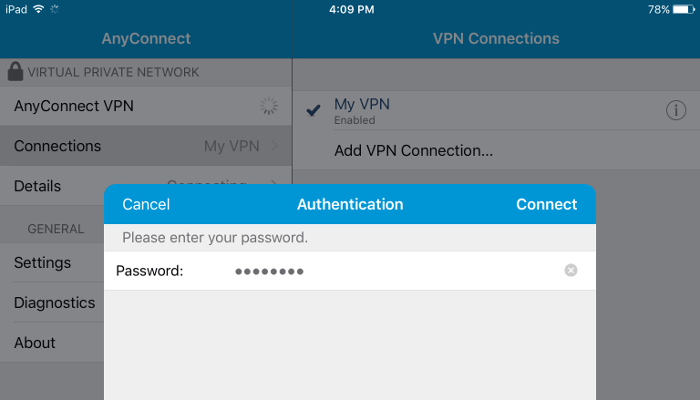
You will be prompted to enter your password (the one you set up for that username when you invoked ocpasswd):
The AnyConnect VPN toggle goes green when you are connected:
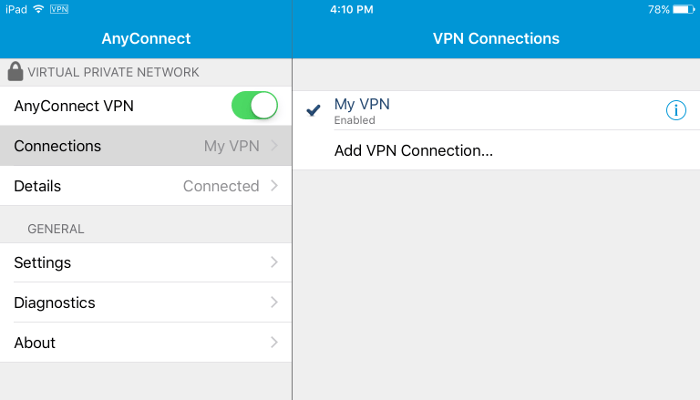
(Also, if you log on to your server and use a command such as sudo tail /var/log/syslog, you will see messages such as sec-mod: initiating session for user 'xuri'.)
Troubleshooting
Client get error: The secure gateway has rejected the connection attempt. A new connection attempt to the same or another secure gateway is needed, which requires re-authentication.
Add MTU settings mtu = 1480 in the configuration file and restart the service.
hi
i use ocserv on cent os 7, do you know ocserv configuration to dose authentication with open ldap ?