![]()
Running Hadoop on Ubuntu Linux (Multi-Node Cluster)
From single-node clusters to a multi-node cluster
We will build a multi-node cluster merge three or more single-node clusters into one multi-node cluster in which one Ubuntu box will become the designated master, and the other box will become only a slave.
Environment Versions
Ubuntu 16.04 LTS Xenial Xerus 64-bit Server Edition
Hadoop 2.7.2
Prerequisites
Configuring single-node clusters first, here we have used three single node clusters. Shutdown each single-node cluster with the following command:
hduser1@master:~$ $HADOOP_HOME/sbin/stop-all.sh
Networking
The easiest is to put three machines in the same network with regard to hardware and software configuration.
Update /etc/hosts on both machines. Put the alias to the ip addresses of all the machines. Here we are creating a cluster of 3 machines, one is master, one is slave1 and other is slave2:
hduser1@master:$ sudo vim /etc/hosts
Add the following lines for two node cluster
172.16.136.140    master  # IP address of the master node
172.16.136.141    slave1  # IP address of the slave1 node
172.16.136.142    slave2  # IP address of the slave2 node
SSH access
The hduser1 user on the master (ssh hduser1@master) must be able to connect:
- to its own user account on the master - i.e. ssh master in this context.
- to the
hduser1user account on the slave (i.e.ssh hduser1@slave1) via a password-less SSH login.
Set up password-less SSH login between cluster:
hduser1@master:~$ ssh-copy-id -i $HOME/.ssh/id_rsa.pub hduser1@slave1
hduser1@master:~$ ssh-copy-id -i $HOME/.ssh/id_rsa.pub hduser1@slave2
- Connect with user hduser1 from the master to the user account hduser1 on the slave1 and slave2.
From master to master
hduser1@master:~$ ssh master
From master to slave1
hduser1@master:~$ ssh slave1
From slave1 to slave2
hduser1@slave1:~$ ssh slave2
Hadoop
Cluster Overview
This will describe how to configure one Ubuntu box as a master node and the other Ubuntu box as a slave node.
Configuration
$HADOOP_HOME/etc/hadoop/masters
The machine on which sbin/start-dfs.sh is running will become the primary NameNode. This file should be updated on all the nodes. Create the masters file in the $HADOOP_HOME/etc/hadoop/ directory:
$ sudo vim $HADOOP_HOME/etc/hadoop/masters
Add the following line
master
$HADOOP_HOME/etc/hadoop/slaves
This file should be updated on all the nodes. Open the slaves file in the $HADOOP_HOME/etc/hadoop/ directory:
$ sudo vim $HADOOP_HOME/etc/hadoop/slaves
Add the following lines (remove localhost)
slave1
slave2
$HADOOP_HOME/etc/hadoop/*-site.xml (All nodes.)
Open this file in the $HADOOP_HOME/etc/hadoop/ directory:
$ sudo vim $HADOOP_HOME/etc/hadoop/core-site.xml
Change the fs.default.name parameter (in $HADOOP_HOME/etc/hadoop/core-site.xml), which specifies the NameNode (the HDFS master) host and port.
$HADOOP_HOME/etc/hadoop/core-site.xml (All nodes.)
<property>
    <name>hadoop.tmp.dir</name>
    <value>/app/hadoop/tmp</value>
    <description>A base for other temporary directories.</description>
</property>

<property>
    <name>fs.default.name</name>
    <value>hdfs://master:54310</value>
    <description>The name of the default file system.  A URI whose
    scheme and authority determine the FileSystem implementation.  The
    uri's scheme determines the config property (fs.SCHEME.impl) naming
    the FileSystem implementation class.  The uri's authority is used to
    determine the host, port, etc. for a filesystem.</description>
</property>
$HADOOP_HOME/etc/hadoop/mapred-site.xml (All nodes.)
Open this file in the $HADOOP_HOME/etc/hadoop/ directory
$ sudo vim $HADOOP_HOME/etc/hadoop/mapred-site.xml
Change the mapred.job.tracker parameter (in $HADOOP_HOME/etc/hadoop/mapred-site.xml), which specifies the JobTracker (MapReduce master) host and port and add mapred.framework.name property.
$HADOOP_HOME/etc/hadoop/mapred-site.xml (All nodes.)
<property>
    <name>mapred.job.tracker</name>
    <value>master:54311</value>
    <description>The host and port that the MapReduce job tracker runs
    at.  If "local", then jobs are run in-process as a single map
    and reduce task.
    </description>
</property>

<property>
    <name>mapred.framework.name</name>
    <value>yarn</value>
</property>
$HADOOP_HOME/etc/hadoop/hdfs-site.xml (All nodes.)
Open this file in the $HADOOP_HOME/etc/hadoop/ directory
$ sudo vim $HADOOP_HOME/etc/hadoop/hdfs-site.xml
Change the dfs.replication parameter (in $HADOOP_HOME/etc/hadoop/hdfs-site.xml) which specifies the default block replication. We have two nodes as slave available, so we set dfs.replication to 2. Changes to be like this:
<property>
    <name>dfs.replication</name>
    <value>2</value>
    <description>Default block replication.
        The actual number of replications can be specified when the file is created.
        The default is used if replication is not specified in create time.
        </description>
</property>
Paste the following between <configuration></configuration> in file $HADOOP_HOME/etc/hadoop/yarn-site.xml:
<property>
    <name>yarn.resourcemanager.resource-tracker.address</name>
    <value>master:8025</value>
</property>
<property>
    <name>yarn.resourcemanager.scheduler.address</name>
    <value>master:8035</value>
</property>
<property>
    <name>yarn.resourcemanager.address</name>
    <value>master:8050</value>
</property>
Applying Master node specific Hadoop configuration: (Only for master nodes)
These are some configuration to be applied over Hadoop master nodes (Since we have only one master node it will be applied to only one master node.)
Remove existing Hadoop data folder (which was created while single-cluster hadoop setup.)
hduser1@master:~$ sudo rm -rf /app/hadoop/tmp
Make same (/app/hadoop/tmp) directory and create NameNode (/usr/local/hadoop_tmp/hdfs/namenode) directory:
hduser1@master:~$ sudo mkdir -pv /app/hadoop/tmp/hdfs/namenode
Make hduser1 as owner of that directory:
hduser1@master:~$ sudo chown hduser1:hadoop_group -R /app/hadoop/tmp/
Applying Slave node specific Hadoop configuration (Only for slave nodes)
Since we have three slave nodes, we will be applying the following changes over slave1 and slave2 nodes:
Remove existing Hadoop_data folder (which was created while single node hadoop setup)
$ sudo rm -rf /app/hadoop/tmp
Creates same (/app/hadoop/tmp) folder, an inside this folder again create DataNode (/app/hadoop/tmp/hdfs/namenode) directory:
$ sudo mkdir -pv /app/hadoop/tmp/hdfs/datanode
Make hduser as owner of that directory
$ sudo chown hduser1:hadoop_group -R /app/hadoop/tmp/
Formatting the HDFS filesystem via the NameNode (Only for master nodes)
Format the cluster's HDFS file system
$ hdfs namenode -format
Starting the multi-node cluster (Only for master nodes)
hduser1@master:~$ start-dfs.sh && start-yarn.sh
By this command the NameNode daemon is started on master, and DataNode daemons are started on all slaves (here: slave1 and slave2).
Track/Monitor/Verify Hadoop cluster (Run on any Node)
Verify Hadoop daemons on Master, run the following commands
hduser1@master:~$ jps
7104 Jps
6386 SecondaryNameNode
6555 ResourceManager
6158 NameNode
Verify Hadoop daemons on any slave (here: slave1 and slave2), DataNode and NodeManager should run:
$ jps
1344 DataNode
1653 Jps
1463 NodeManager
Monitor Hadoop ResourseManage and Hadoop NameNode via web-version
ResourceManager: http://master:8088
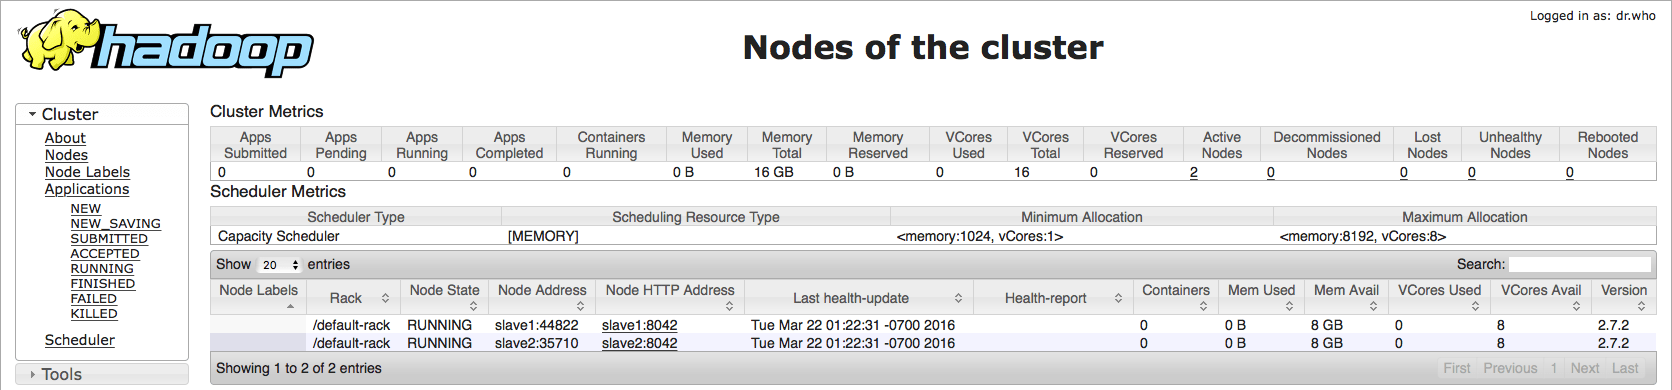
Note: The Job Tracker and Task Tracker concepts are different in Hadoop YARN, In new version of Hadoop we can monitor jobs being executed at ResourseManage.
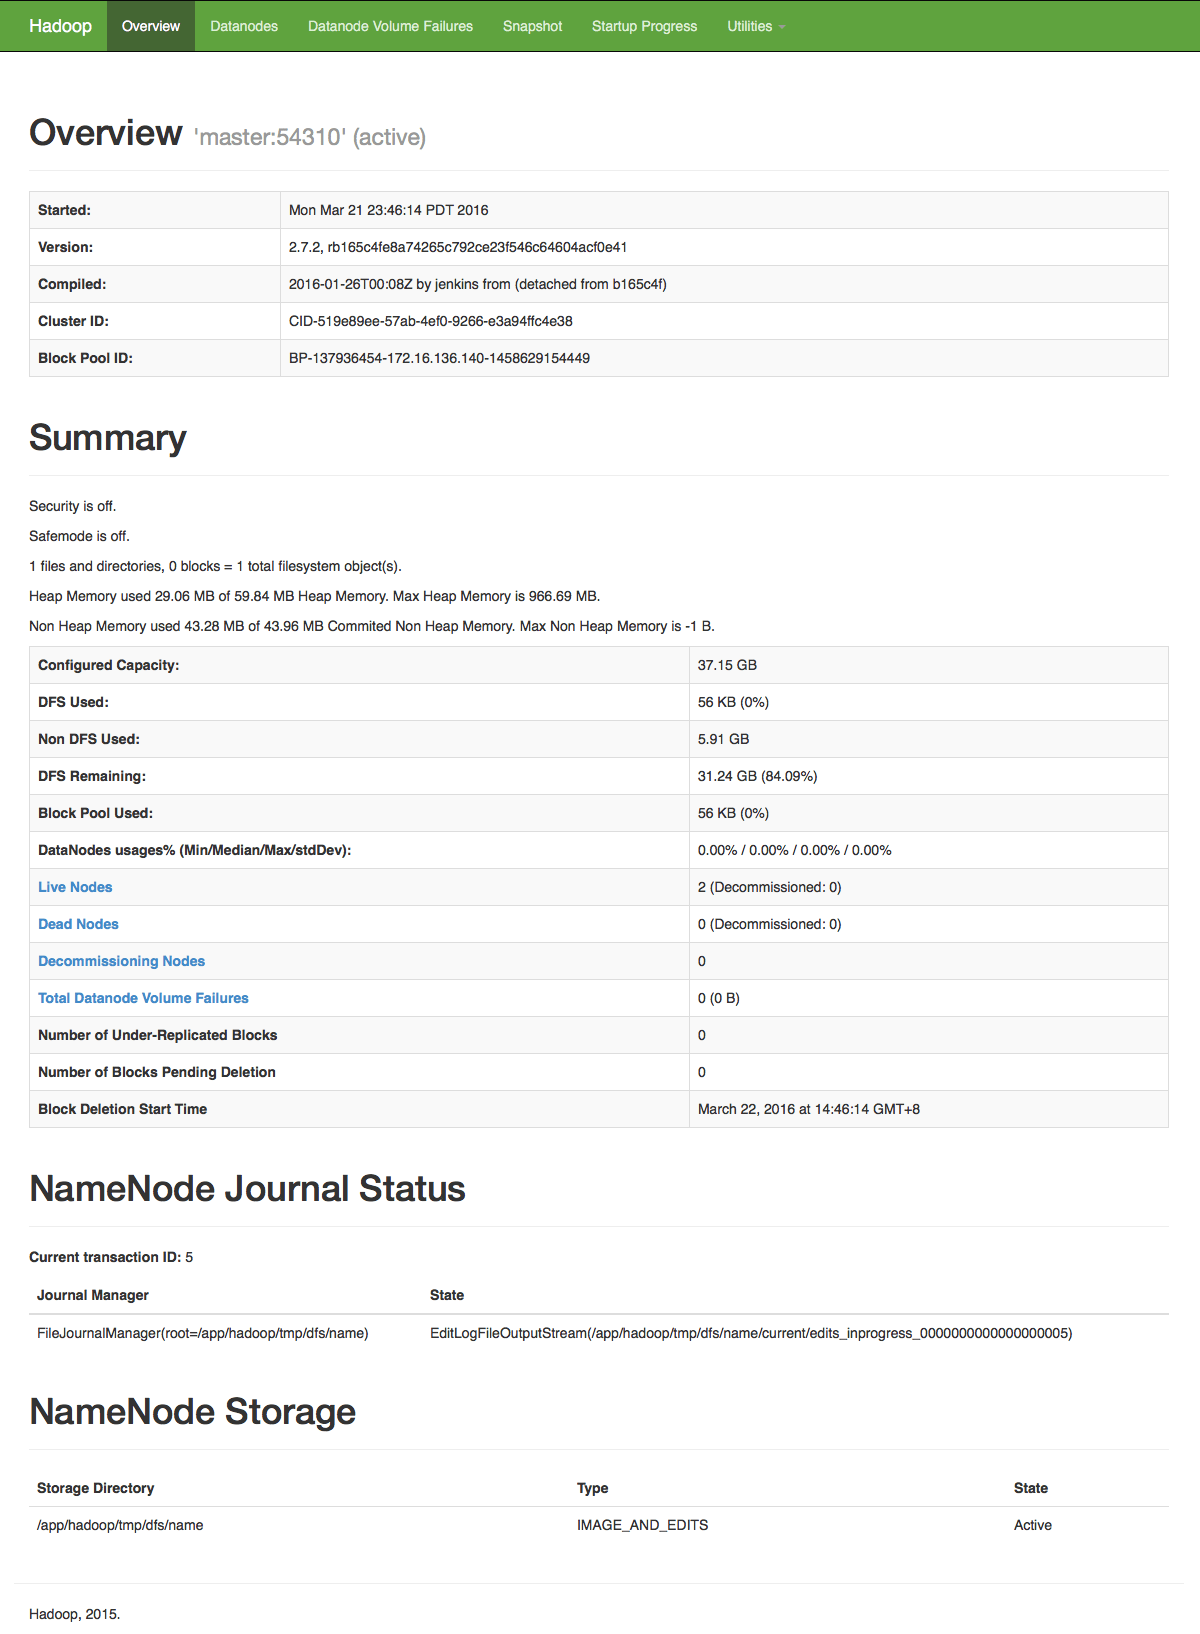
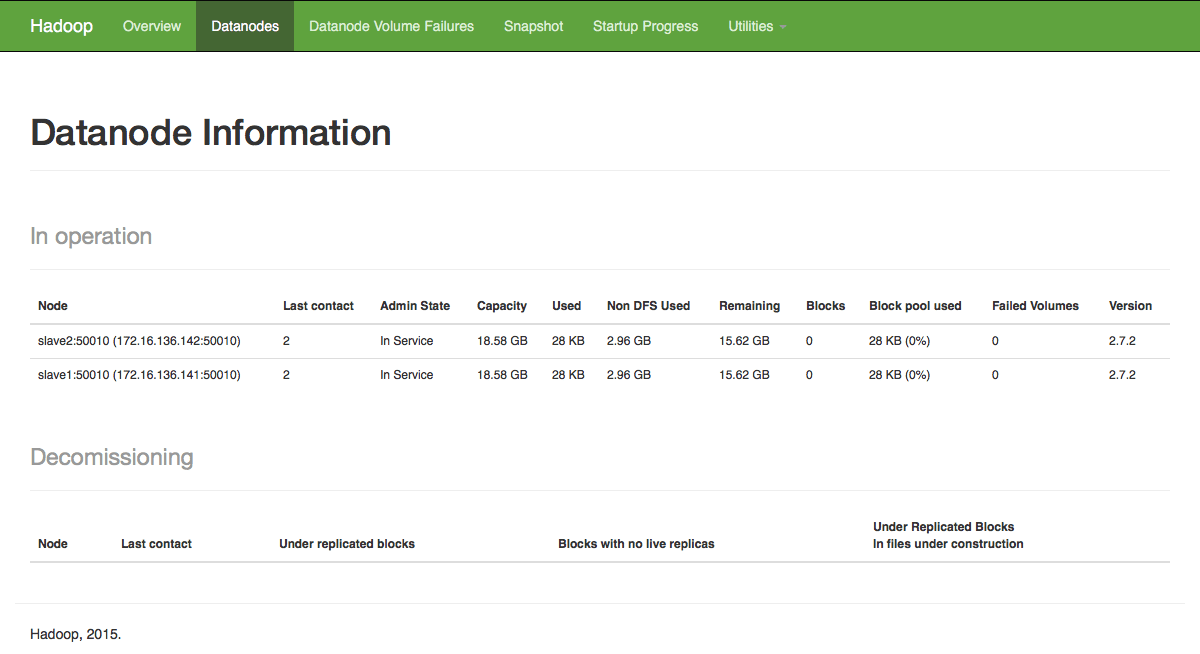
http://localhost:50070 - web UI of the NameNode daemon
Datanode Information
Create input directory on HDFS:
hduser1@master:~$ hadoop fs -mkdir /input
Execute example program:
hduser1@master:~$ hadoop jar $HADOOP_HOME/share/hadoop/mapreduce/hadoop-mapreduce-examples*.jar wordcount /input /output
Check output directory:
hduser1@master:~$ hadoop fs -ls /output
Thanks for this . It got me going with my first multinode cluster.
Excellent guide!! .. help me a lot.
I think in step
$HADOOP_HOME/etc/hadoop/hdfs-site.xml (All nodes.)
all properties yarn.resourcemanager.* goes to the yarn-site.xml instead of core-site.xml
Thanks for your comments, I have fix this mistake.