![]()
Wiki
Apache Hadoop is a set of algorithms (an open-source software framework written in Java) for distributed storage and distributed processing of very large data sets (Big Data) on computer clusters built from commodity hardware. All the modules in Hadoop are designed with a fundamental assumption that hardware failures (of individual machines, or racks of machines) are commonplace and thus should be automatically handled in software by the framework.
In this tutorial I will describe the required steps for setting up a pseudo-distributed, single-node Hadoop cluster backed by the Hadoop Distributed File System.
Benefits of using Hadoop
The architecture of Hadoop allows you to scale your hardware as and when you need to. New nodes can be added incrementally without having to worry about the change in data formats or the handling of applications that sit on the file system.
One of the most important features of Hadoop is that it allows you to save enormous amounts of money by substituting cheap commodity servers for expensive ones. This is possible because Hadoop transfers the responsibility of fault tolerance from the hardware layer to the application layer.
Environment Versions
Ubuntu 16.04 LTS Xenial Xerus 64-bit Server Edition
Hadoop 2.7.2
Single-node Installation
The report here will describe the required steps for setting up a single-node Hadoop cluster backed by the Hadoop Distributed File System, running on Ubuntu Linux. Hadoop is a framework written in Java for running applications on large clusters of commodity hardware and incorporates features similar to those of the Google File System (GFS) and of the MapReduce computing paradigm. Hadoop’s HDFS is a highly fault-tolerant distributed file system and, like Hadoop in general, designed to be deployed on low-cost hardware. It provides high throughput access to application data and is suitable for applications that have large data sets.

Before we start, we will understand the meaning of the following:
DataNode
A DataNode stores data in the Hadoop File System. A functional file system has more than one DataNode, with the data replicated across them.
NameNode
The NameNode is the centrepiece of an HDFS file system. It keeps the directory of all files in the file system, and tracks where across the cluster the file data is kept. It does not store the data of these file itself.
NodeManager
The NodeManager (NM) is YARN's per-node agent, and takes care of the individual compute nodes in a Hadoop cluster. This includes keeping up-to date with the ResourceManager (RM), overseeing containers' life-cycle management; monitoring resource usage (memory, CPU) of individual containers, tracking node-health, log's management and auxiliary services which may be exploited by different YARN applications.
ResourceManager
ResourceManager (RM) is the master that arbitrates all the available cluster resources and thus helps manage the distributed applications running on the YARN system. It works together with the per-node NodeManagers (NMs) and the per-application ApplicationMasters (AMs).
Secondary Namenode
Secondary Namenode whole purpose is to have a checkpoint in HDFS. It is just a helper node for namenode.
Install Java
Hadoop requires Java to be installed, so let's begin by installing Java, update the source list:
user@ubuntu:~$ sudo apt-get update
The OpenJDK project is the default version of Java, that is provided from a supported Ubuntu repository.
user@ubuntu:~$ sudo apt-get install openjdk-8-jdk
These commands will update the package information on your server and then install Java. After executing these commands, execute the following command to verify that Java has been installed:
user@ubuntu:~$ java -version
If Java has been installed, this should display the version details as illustrated in the following output:
openjdk version "1.8.0_01-internal"
OpenJDK Runtime Environment (build 1.8.0_01-internal-b15)
OpenJDK 64-Bit Server VM (build 25.01-b15, mixed mode)
If you already have Java JDK installed on your system, then you need not run the above command.
Adding a dedicated Hadoop system user
user@ubuntu:~$ sudo addgroup hadoop_group
user@ubuntu:~$ sudo adduser --ingroup hadoop_group hduser1
This will add the user hduser1 and the group hadoop_group to the local machine. Add hduser1 to the sudo group:
user@ubuntu:~$ sudo adduser hduser1 sudo
Configuring SSH
The hadoop control scripts rely on SSH to peform cluster-wide operations. For example, there is a script for stopping and starting all the daemons in the clusters. To work seamlessly, SSh needs to be etup to allow password-less login for the hadoop user from machines in the cluster. The simplest ay to achive this is to generate a public/private key pair, and it will be shared across the cluster.
Hadoop requires SSH access to manage its nodes, i.e. remote machines plus your local machine. For our single-node setup of Hadoop, we therefore need to configure SSH access to localhost for the hduser user we created in the earlier.
We have to generate an SSH key for the hduser1 user.
user@ubuntu:~$ su - hduser1
hduser1@ubuntu:~$ ssh-keygen -t rsa -P ''
-P '', here indicates an empty password
You have to enable SSH access to your local machine with this newly created key which is done by the following command:
hduser1@ubuntu:~$ cat $HOME/.ssh/id_rsa.pub >> $HOME/.ssh/authorized_keys
The final step is to test the SSH setup by connecting to the local machine with the hduser1 user. The step is also needed to save your local machine's host key fingerprint to the hduser1 user's known hosts file.
hduser1@ubuntu:~$ ssh localhost
If the SSH connection fails, we can try the following (optional):
- Enable debugging with
ssh -vvv localhostand investigate the error in detail. - Check the SSH server configuration in
/etc/ssh/sshd_config. If you made any changes to the SSH server configuration file, you can force a configuration reload withsudo /etc/init.d/ssh reload.
Main Installation
Start by switching to hduser1
user@ubuntu:~$ su - hduser1
Download and extract last version Hadoop binary code from hadoop.apache.org. I use current stable version Hadoop 2.7.2.
$ wget http://ftp.tc.edu.tw/pub/Apache/hadoop/common/hadoop-2.7.2/hadoop-2.7.2.tar.gz
$ sudo tar -xvzf hadoop-*.tar.gz -C /usr/local/ && sudo mv /usr/local/hadoop-* /usr/local/hadoop
Setup Environment Variables for Hadoop
Add the following entries to .bashrc file
Set Hadoop-related environment variables:
# Set Hadoop-related environment variables
export HADOOP_HOME=/usr/local/hadoop
# Add Hadoop bin/ directory to PATH
export PATH=$PATH:$HADOOP_HOME/bin:$HADOOP_HOME/sbin
Make change to take effect:
$ source ~/.bashrc
Configuration
hadoop-env.sh
Change the file: $HADOOP_HOME/etc/hadoop/hadoop-env.sh
export JAVA_HOME=${JAVA_HOME}
to in the same file
export JAVA_HOME=$(readlink -f /usr/bin/java | sed "s:bin/java::")
$HADOOP_HOME/etc/hadoop/*-site.xml
Now we create the directory and set the required ownerships and permissions
hduser1@ubuntu:~$ sudo mkdir -p /app/hadoop/tmp
hduser1@ubuntu:~$ sudo chown hduser1:hadoop_group /app/hadoop/tmp
hduser1@ubuntu:~$ sudo chmod 750 /app/hadoop/tmp
The last line gives reading and writing permissions to the /app/hadoop/tmp directory
Error: If you forget to set the required ownerships and permissions, you will see a java.io.IO Exception when you try to format the name node.
Paste the following between <configuration></configuration>
In file $HADOOP_HOME/etc/hadoop/core-site.xml
<property>
    <name>hadoop.tmp.dir</name>
    <value>/app/hadoop/tmp</value>
    <description>A base for other temporary directories.</description>
</property>

<property>
    <name>fs.default.name</name>
    <value>hdfs://localhost:54310</value>
    <description>The name of the default file system.  A URI whose
    scheme and authority determine the FileSystem implementation.  The
    uri's scheme determines the config property (fs.SCHEME.impl) naming
    the FileSystem implementation class.  The uri's authority is used to
    determine the host, port, etc. for a filesystem.</description>
</property>
Create mapred-site.xml file from template:
hduser1@ubuntu:~$ sudo cp $HADOOP_HOME/etc/hadoop/mapred-site.xml.template $HADOOP_HOME/etc/hadoop/mapred-site.xml && sudo vim $HADOOP_HOME/etc/hadoop/mapred-site.xml
In file $HADOOP_HOME/etc/hadoop/mapred-site.xml
<property>
    <name>mapred.job.tracker</name>
    <value>localhost:54311</value>
    <description>The host and port that the MapReduce job tracker runs
    at.  If "local", then jobs are run in-process as a single map
    and reduce task.
    </description>
</property>
In file $HADOOP_HOME/etc/hadoop/hdfs-site.xml
<property>
    <name>dfs.replication</name>
    <value>1</value>
    <description>Default block replication.
    The actual number of replications can be specified when the file is created.
    The default is used if replication is not specified in create time.
    </description>
</property>
Formatting the HDFS filesystem via the NameNode
To format the filesystem (which simply initializes the directory specified by the dfs.name.dir variable). Run the command
hduser1@ubuntu:~$ hdfs namenode -format
Starting single-node cluster
Run the command
hduser1@ubuntu:~$ start-dfs.sh && start-yarn.sh
This will startup a Namenode, DataNode, ResourceManager and a NodeManager on the machine. Verify this by typing in the following command:
hduser1@ubuntu:~$ jps
4704 NameNode
5573 Jps
5015 SecondaryNameNode
5160 ResourceManager
5273 NodeManager
4842 DataNode
If you can see a result similar to the depicted in the screenshot above, it means that you now have a functional instance of Hadoop running on your server. The output means that we now have a functional instance of Hadoop running on our server.
Stop Hadoop
We run stop-dfs.sh && stop-yarn.sh (or stop-all.sh) to stop all the daemons running on our machine:
hduser1@ubuntu:~$ stop-dfs.sh && stop-yarn.sh
Hadoop Web Interfaces
http://localhost:50070 - web UI of the NameNode daemon
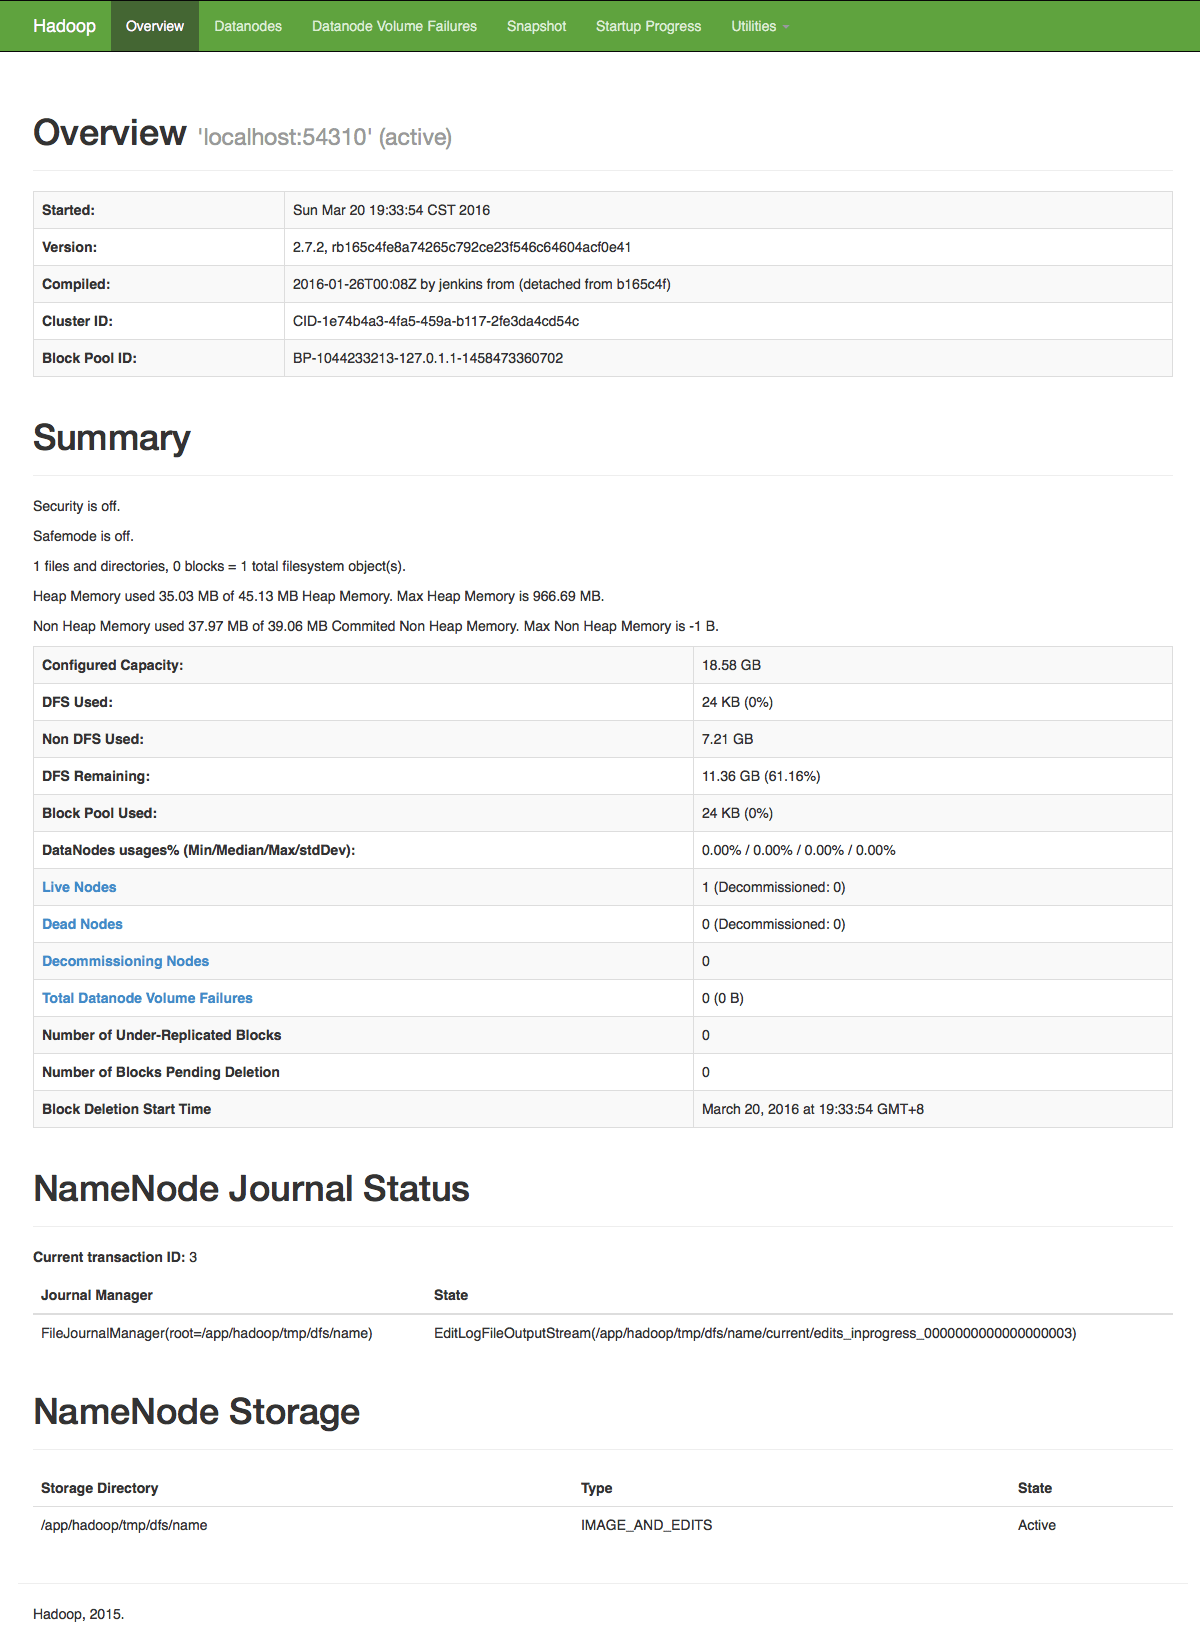
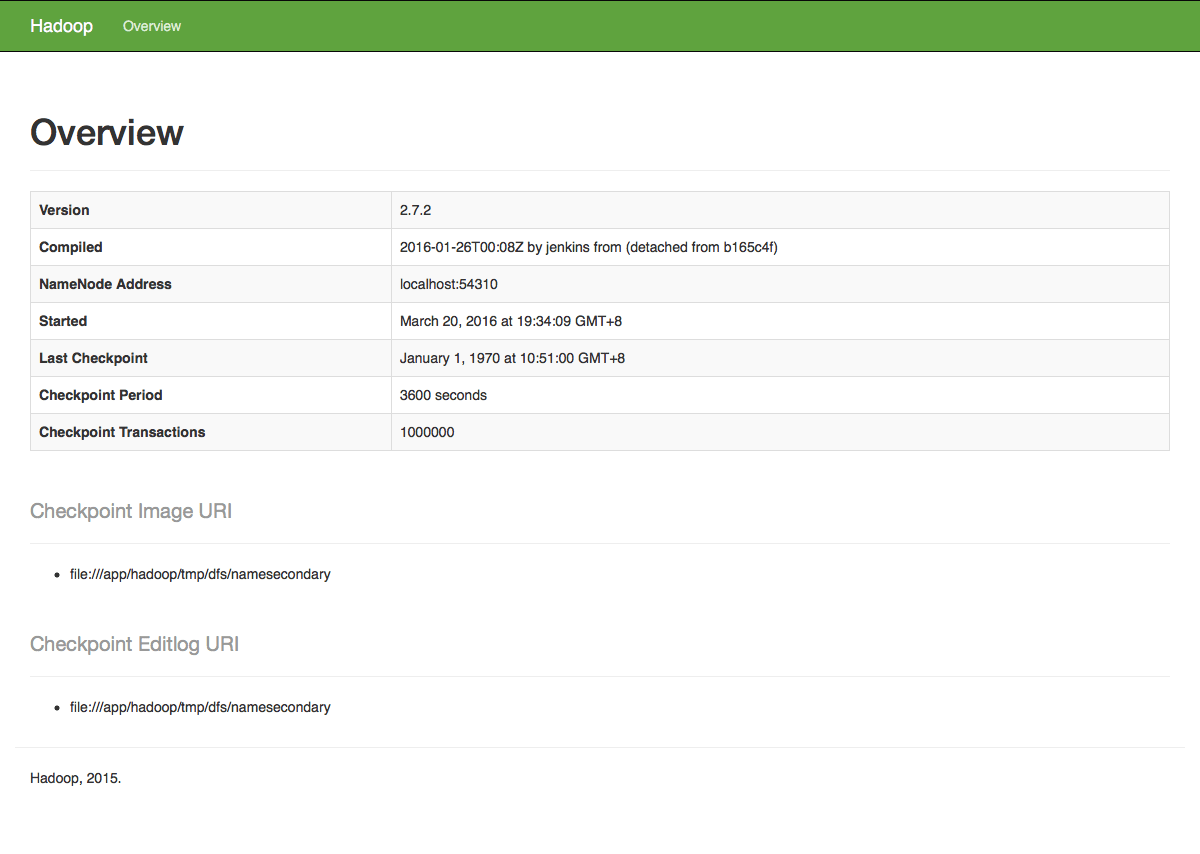
http://localhost:50090 - web UI of the status
http://localhost:50075 - web UI of the data node daemon
Note
- The masters and slaves file should contain localhost.
- In
/etc/hosts, the ip of the system should be given with the alias aslocalhost. - Set the java home path in
hadoop-env.shas well.bashrc.
Related Article Setup Hadoop on Ubuntu (Multi-Node Cluster)
Hello,
Very nice article, However I don't see any hardware recommendations here. I know there is usually a large or a perceived large hardware/resource need when dealing with big data. However if we are testing/learning what would be the recommended hardware/resources for it?
Thanks,
Michael
- Intel Core 2 Duo/Quad/hex/Octa or higher end 64 bit processor PC or Laptop (Minimum operating frequency of 2.5GHz)
- Hard Disk capacity of 1- 4TB.
- 16GB - 256 GB RAM
- 10 Gigabit Ethernet or Bonded Gigabit Ethernet