Wiki
The Apache Cassandra database is the right choice when you need scalability and high availability without compromising performance. Linear scalability and proven fault-tolerance on commodity hardware or cloud infrastructure make it the perfect platform for mission-critical data.Cassandra's support for replicating across multiple datacenters is best-in-class, providing lower latency for your users and the peace of mind of knowing that you can survive regional outages.
DataStax OpsCenter is the web-based visual management and monitoring. solution for DataStax Enterprise (DSE).
In this post I will write how to setup Cassandra and OpsCenter on Ubuntu server. OpsCenter 5.2.x only supports up to Cassandra 2.1. OpsCenter 6.0 only supports DataStax Enterprise. So there is no way to use OpsCenter with Apache Cassandra 2.2+. More info in DataStax product compatibility table.
Environment Versions
Ubuntu 16.10 Yakkety Yak 64-bit Server Edition
Node1 - 172.16.136.147 Cassandra 2.1.5
Node2 - 172.16.136.148 Cassandra 2.1.5
Node3 - 172.16.136.149 Cassandra 2.1.5
Node4 - 172.16.136.150 DataStax OpsCenter 5.2.5 (2 GB of RAM available to OpsCenter)
Install Java
Apache Cassandra requires Java to be installed, so let's begin by installing Java, update the source list:
$ sudo apt-get update
The OpenJDK project is the default version of Java, that is provided from a supported Ubuntu repository.
$ sudo apt-get install openjdk-8-jdk
These commands will update the package information on your server and then install Java. After executing these commands, execute the following command to verify that Java has been installed:
$ java -version
If Java has been installed, this should display the version details as illustrated in the following output:
openjdk version "1.8.0_121"
OpenJDK Runtime Environment (build 1.8.0_121-8u121-b13-0ubuntu1.16.10.2-b13)
OpenJDK 64-Bit Server VM (build 25.121-b13, mixed mode)
If you already have Java JDK installed on your system, then you need not run the above command.
Configuring SSH
The Apache Cassandra control scripts rely on SSH to peform cluster-wide operations. For example, there is a script for stopping and starting all the daemons in the clusters. To work seamlessly, SSh needs to be etup to allow password-less login for the Apache Cassandra user from machines in the cluster. The simplest ay to achive this is to generate a public/private key pair, and it will be shared across the cluster.
Apache Cassandra requires SSH access to manage its nodes, i.e. remote machines plus your local machine. For our multi-node setup of Apache Cassandra, we therefore need to configure SSH access to localhost for the hduser user we created in the earlier.
We have to generate an SSH key for the current user.
$ ssh-keygen -t rsa -P ''
-P '', here indicates an empty password
You have to enable SSH access to your local machine with this newly created key which is done by the following command:
$ cat $HOME/.ssh/id_rsa.pub >> $HOME/.ssh/authorized_keys
The final step is to test the SSH setup by connecting to the local machine with the current user. The step is also needed to save your local machine's host key fingerprint to the current user's known hosts file.
$ ssh localhost
If the SSH connection fails, we can try the following (optional):
- Enable debugging with
ssh -vvv localhostand investigate the error in detail. - Check the SSH server configuration in
/etc/ssh/sshd_config. If you made any changes to the SSH server configuration file, you can force a configuration reload withsudo /etc/init.d/ssh reload.
Installation
Add the Apache repository of Cassandra to /etc/apt/sources.list.d/cassandra.sources.list on every node:
$ echo "deb http://debian.datastax.com/community stable main" | sudo tee -a /etc/apt/sources.list.d/datastax.community.list
Add the Apache Cassandra repository keys on every node::
$ curl -L https://debian.datastax.com/debian/repo_key | sudo apt-key add -
Update the repositories and install python support:
$ sudo apt-get update && sudo apt install python-pip -y
$ wget http://launchpadlibrarian.net/109052632/python-support_1.0.15_all.deb
$ sudo dpkg -i python-support_1.0.15_all.deb
Install Cassandra:
$ sudo apt-get install dsc21=2.1.5-1 cassandra=2.1.5 cassandra-tools=2.1.5 -y
Configuring Cassandra for clustering
Stop Cassandra:
$ sudo service cassandra stop
Edit Cassandra's configuration file: /etc/cassandra/cassandra.yaml on every node:
- seeds: "172.16.136.147,172.16.136.148,172.16.136.149"
and set listen_address and rpc_address.
Edit /etc/cassandra/cassandra-env.sh on every node, replace IP address with <public name> and uncomment the following line:
JVM_OPTS="$JVM_OPTS -Djava.rmi.server.hostname=172.16.136.147"
Set LOCAL_JMX parameter to no, reference Nodetool or JMX connections failing on remote nodes:
LOCAL_JMX=no
Set JVM_OPTS="$JVM_OPTS -Dcom.sun.management.jmxremote.authenticate= parameter to false:
JVM_OPTS="$JVM_OPTS -Dcom.sun.management.jmxremote.authenticate=false"
Start Cassandra
$ sudo service cassandra start
Check the nodes
$ sudo nodetool status
The output should be similar to the following:
Datacenter: datacenter1
=======================
Status=Up/Down
|/ State=Normal/Leaving/Joining/Moving
--  Address         Load       Tokens       Owns (effective)  Host ID                               Rack
UN  172.16.136.147  157.74 KiB  256          65.6%             bd21c728-0b6e-4574-ba29-7a712f6ca01d  rack1
UN  172.16.136.148  236.27 KiB  256          65.0%             e39141fe-41ba-4a34-a413-43cba395495f  rack1
UN  172.16.136.149  152.05 KiB  256          69.5%             22dde31d-22a5-47b3-af3d-9be6d86ead21  rack1
Testing the Cassandra Cluster
To test our Cassandra cluster, we will create a keyspace, a table and a row to one of the nodes, and then we will expect it to be added on the other nodes. Enter Cassandra's command line client:
Install the latest python driver
$ sudo -H pip install cassandra-driver
Export a user variable to override the bundled driver
$ export CQLSH_NO_BUNDLED=true
Create a keyspace, a table and a row to one of the nodes:
$ cqlsh
Connected to Test Cluster at 127.0.0.1:9042.
[cqlsh 5.0.1 | Cassandra 2.1.5 | CQL spec 3.2.0 | Native protocol v3]
Use HELP for help.

cqlsh> CREATE KEYSPACE test WITH replication = {
   ...     'class': 'SimpleStrategy',
   ...     'replication_factor': '1'
   ... };
cqlsh> USE test;
cqlsh:test> CREATE TABLE users (
        ...     name text,
        ...     PRIMARY KEY (name));
        ... );
cqlsh:test> INSERT INTO users (name) VALUES ('xuri');
cqlsh:test> SELECT * FROM users;

 name
------
 xuri

(1 rows)
Check the others nodes:
$ cqlsh 172.16.136.147
Connected to Test Cluster at 172.16.136.147:9042.
[cqlsh 5.0.1 | Cassandra 2.1.5 | CQL spec 3.2.0 | Native protocol v3]
Use HELP for help.
cqlsh> USE test;
cqlsh:test> SELECT * FROM users;

 name
------
 xuri

(1 rows)
The user exists, the cluster is working.
Install OpsCenter
Because install OpsCenter via apt-get will be install java-9-oracle automatically, this will be affect the operation of Cassandra, so deploy OpsCenter to Node4 separately.
$ sudo apt-get install opscenter=5.2.5 -y
If got error: keytool error: java.lang.Exception: Key pair not generated, alias <agent_key> already exists, run following command to remove this key:
$ keytool -delete -alias agent_key -keystore /var/lib/opscenter/ssl/agentKeyStore
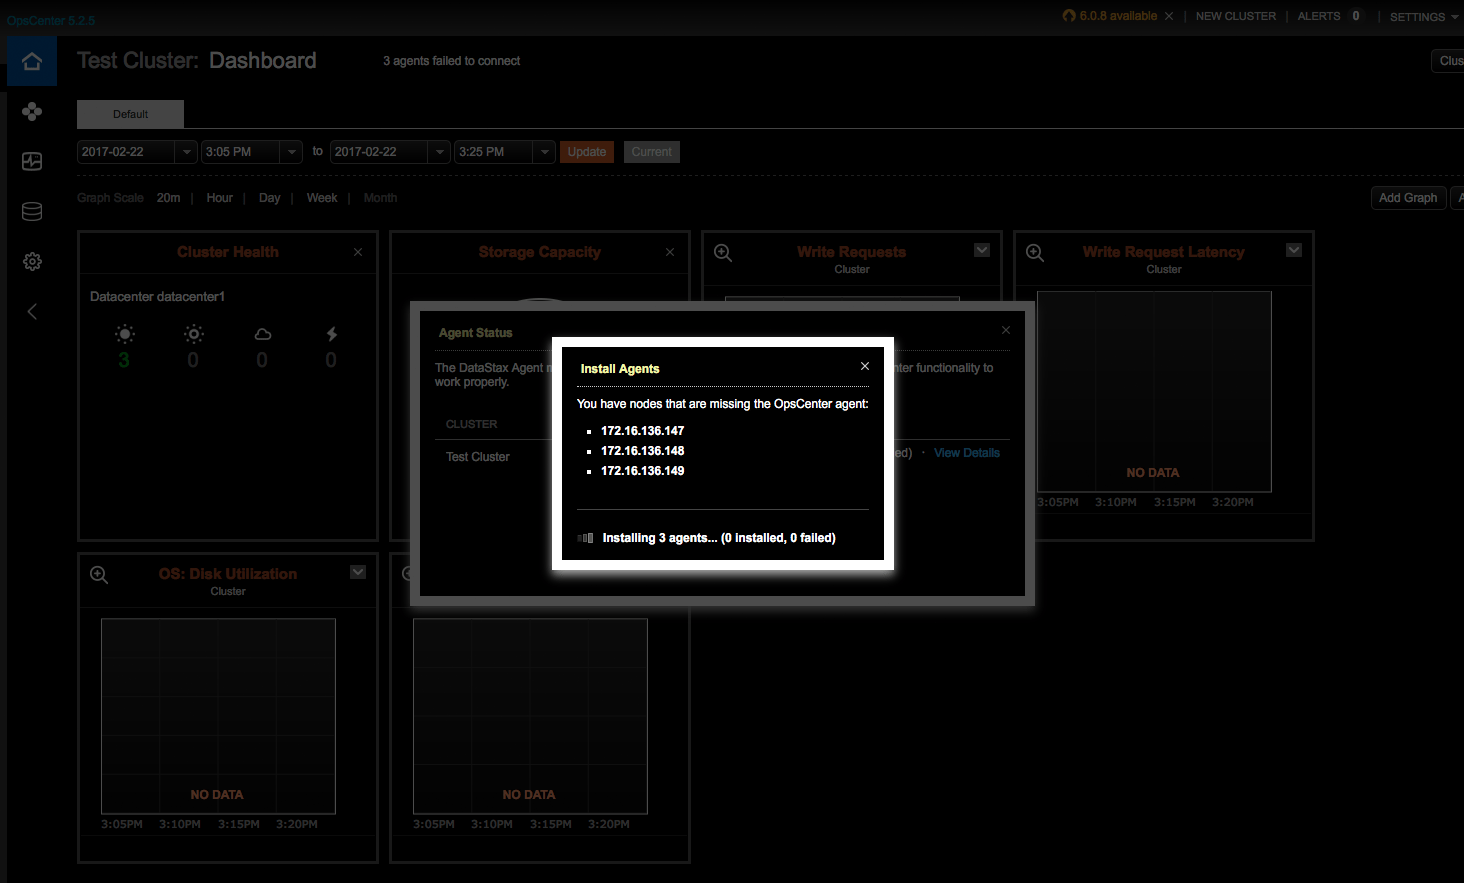
After install visit dashboard on http://172.16.136.150:8888, select Manage Existing Cluster:

Add Cluster

Install Agents